


本文为从零开始写 Docker 系列第十二篇,实现类似 docker stop 的功能,使得我们能够停止指定容器。
完整代码见:https://github.com/lixd/mydocker
欢迎 Star
推荐阅读以下文章对 docker 基本实现有一个大致认识:
- 核心原理:深入理解 Docker 核心原理:Namespace、Cgroups 和 Rootfs
- 基于 namespace 的视图隔离:探索 Linux Namespace:Docker 隔离的神奇背后
- 基于 cgroups 的资源限制
- 基于 overlayfs 的文件系统:Docker 魔法解密:探索 UnionFS 与 OverlayFS
- 基于 veth pair、bridge、iptables 等等技术的 Docker 网络:揭秘 Docker 网络:手动实现 Docker 桥接网络
开发环境如下:
root@mydocker:~# lsb_release -a No LSB modules are available. Distributor ID: Ubuntu Description: Ubuntu 20.04.2 LTS Release: 20.04 Codename: focal root@mydocker:~# uname -r 5.4.0-74-generic 注意:需要使用 root 用户
1. 概述
之前实现了 mydocker run -d 让容器能够后台运行,但是没有实现停止功能,导致无法停止后台运行的容器。
本篇则是实现mydocker stop 命令,让我们能够直接停止后台运行的容器。
2. 实现
容器的本质是进程,那么停止容器就可以看做是结束进程。因此 mydocker stop 的实现思路就是先根据 containerId 查找到它的主进程 PID,然后 Kill 发送 SIGTERM 信号,等待进程结束就好。
整个流程如下图所示:
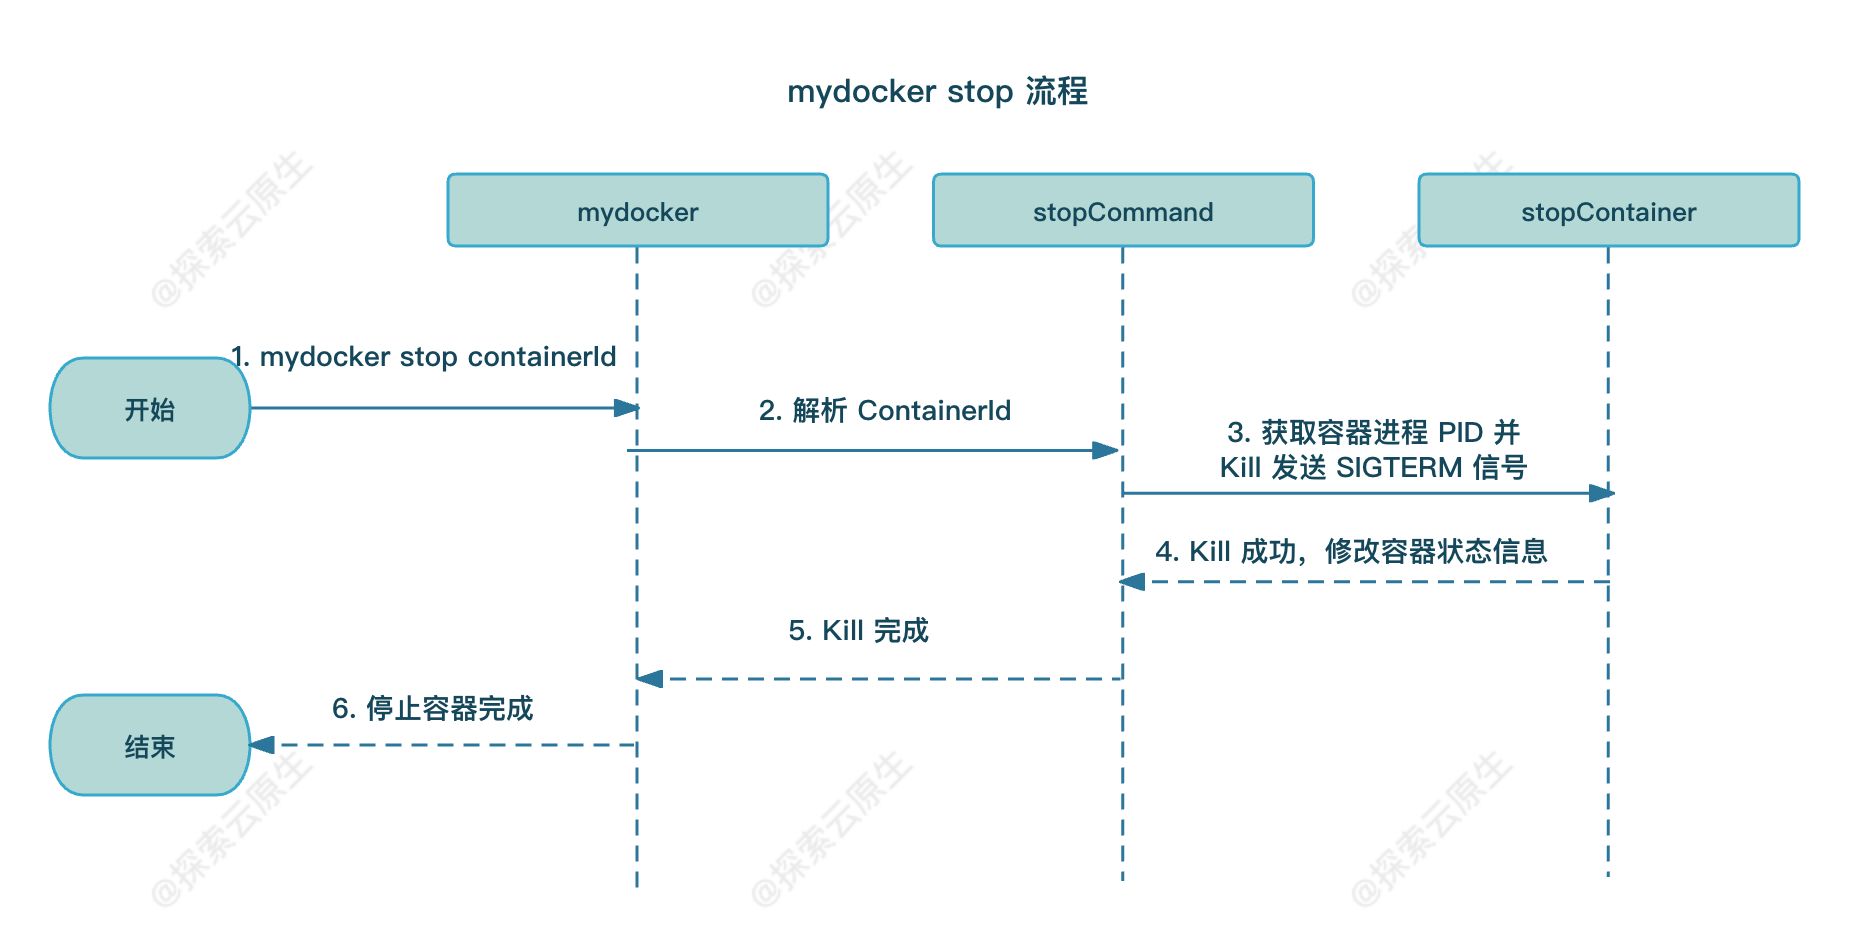
stopCommand
首先在 main_command.go 中增加 stopCommand:
var stopCommand = cli.Command{ Name: "stop", Usage: "stop a container,e.g. mydocker stop 1234567890", Action: func(context *cli.Context) error { // 期望输入是:mydocker stop 容器Id,如果没有指定参数直接打印错误 if len(context.Args()) < 1 { return fmt.Errorf("missing container id") } containerName := context.Args().Get(0) stopContainer(containerName) return nil }, } 然后在 main 函数中加入该命令:
func main(){ // 省略其他内容 app.Commands = []cli.Command{ initCommand, runCommand, commitCommand, listCommand, logCommand, execCommand, stopCommand, } } 核心逻辑都在 stopContainer 中,command 这边只需要解析并传递参数即可。
stopContainer
stopContainer 中就是停止容器的具体实现了。实现也很简单,大致可以分为 3 步:
- 1)首先根据 ContainerId 找到之前记录的容器信息的文件并拿到容器具体信息,主要是 PID
- 2)然后调用 Kill 命令,给指定 PID 发送 SIGTERM
- 3)最后更新容器状态为 stop 并写回记录容器信息的文件;
具体代码如下:
func stopContainer(containerId string) { // 1. 根据容器Id查询容器信息 containerInfo, err := getInfoByContainerId(containerId) if err != nil { log.Errorf("Get container %s info error %v", containerId, err) return } pidInt, err := strconv.Atoi(containerInfo.Pid) if err != nil { log.Errorf("Conver pid from string to int error %v", err) return } // 2.发送SIGTERM信号 if err = syscall.Kill(pidInt, syscall.SIGTERM); err != nil { log.Errorf("Stop container %s error %v", containerId, err) return } // 3.修改容器信息,将容器置为STOP状态,并清空PID containerInfo.Status = container.STOP containerInfo.Pid = " " newContentBytes, err := json.Marshal(containerInfo) if err != nil { log.Errorf("Json marshal %s error %v", containerId, err) return } // 4.重新写回存储容器信息的文件 dirPath := fmt.Sprintf(container.InfoLocFormat, containerId) configFilePath := path.Join(dirPath, container.ConfigName) if err := os.WriteFile(configFilePath, newContentBytes, constant.Perm0622); err != nil { log.Errorf("Write file %s error:%v", configFilePath, err) } } getInfoByContainerId 如下,根据 containerId 拼接出具体 path,读取文件内容拿到启动时记录的容器信息,其中就包括 PID。
func getInfoByContainerId(containerId string) (*container.Info, error) { dirPath := fmt.Sprintf(container.InfoLocFormat, containerId) configFilePath := path.Join(dirPath, container.ConfigName) contentBytes, err := os.ReadFile(configFilePath) if err != nil { return nil, errors.Wrapf(err, "read file %s", configFilePath) } var containerInfo container.Info if err = json.Unmarshal(contentBytes, &containerInfo); err != nil { return nil, err } return &containerInfo, nil } 3. 测试
测试流程为:
- 1)mydocker run -d创建一个 detach 的后台容器
- 2)mydocker stop 该容器
- 3)mydocker ps 查看容器状态是否变更,ps 查看容器进程是否消失
创建一个 detach 容器:
root@mydocker:~/feat-stop/mydocker# go build . root@mydocker:~/feat-stop/mydocker# ./mydocker run -d -name bird top {"level":"info","msg":"createTty false","time":"2024-01-30T14:04:13+08:00"} {"level":"info","msg":"resConf:u0026{ 0 }","time":"2024-01-30T14:04:13+08:00"} {"level":"info","msg":"busybox:/root/busybox busybox.tar:/root/busybox.tar","time":"2024-01-30T14:04:13+08:00"} {"level":"error","msg":"mkdir dir /root/merged error. mkdir /root/merged: file exists","time":"2024-01-30T14:04:13+08:00"} {"level":"error","msg":"mkdir dir /root/upper error. mkdir /root/upper: file exists","time":"2024-01-30T14:04:13+08:00"} {"level":"error","msg":"mkdir dir /root/work error. mkdir /root/work: file exists","time":"2024-01-30T14:04:13+08:00"} {"level":"info","msg":"mount overlayfs: [/usr/bin/mount -t overlay overlay -o lowerdir=/root/busybox,upperdir=/root/upper,workdir=/root/work /root/merged]","time":"2024-01-30T14:04:13+08:00"} {"level":"info","msg":"command all is top","time":"2024-01-30T14:04:13+08:00"} 分别使用 ps 命令和 mydocker ps 命令查询一下 PID
root@mydocker:~/feat-stop/mydocker# ./mydocker ps ID NAME PID STATUS COMMAND CREATED 3184421796 bird 180831 running top 2024-01-30 14:04:1 root@mydocker:~/feat-stop/mydocker# ps -ef|grep top root 180831 1 0 14:04 pts/10 00:00:00 top 可以看到,PID 为 180831 的进程就是我们的容器进程。
现在执行 stop 命令停止该容器
root@mydocker:~/feat-stop/mydocker# ./mydocker stop 3184421796 再通过 mydocker ps 命令查看一下
root@mydocker:~/feat-stop/mydocker# ./mydocker ps ID NAME PID STATUS COMMAND CREATED 3184421796 bird stopped top 2024-01-30 14:04:13 可以看到,状态变成了 stopped,并且 PID 一栏也是空的。
最后执行 ps 查看一下是不是真的停掉了
root@mydocker:~/feat-stop/mydocker# ps -ef|grep top root 180869 177607 0 14:06 pts/10 00:00:00 grep --color=auto top 可以看到,原来容器的进程已经退出了,说明 stop 是成功的。
4. 小结
本篇主要实现 mydocker stop 命令,根据 ContainerId 找到容器进程 PID,然后 Kill 并更新容器状态信息。
完整代码见:https://github.com/lixd/mydocker
欢迎关注~
【从零开始写 Docker 系列】持续更新中,搜索公众号【探索云原生】订阅,阅读更多文章。

相关代码见 feat-stop 分支,测试脚本如下:
需要提前在 /root 目录准备好 busybox.tar 文件,具体见第四篇第二节。
# 克隆代码 git clone -b feat-stop https://github.com/lixd/mydocker.git cd mydocker # 拉取依赖并编译 go mod tidy go build . # 测试 ./mydocker run -d -name c1 top # 查看容器 Id ./mydocker ps # stop 停止指定容器 ./mydocker stop ${containerId} 


