
大家好,我是潘Sir,持续分享IT技术,帮你少走弯路。《鸿蒙应用开发从入门到项目实战》系列文章持续更新中,陆续更新AI+编程、企业级项目实战等原创内容、欢迎关注!
ArkUI提供了各种布局组件用于界面布局,本文研究使用Grid组件实现网格布局。
一、概述
网格布局(Grid)是一种强大的布局方案,它将页面划分为行和列组成的网格,然后将页面内容在二维网格中进行自由的定位,以下效果都可通过网格布局实现
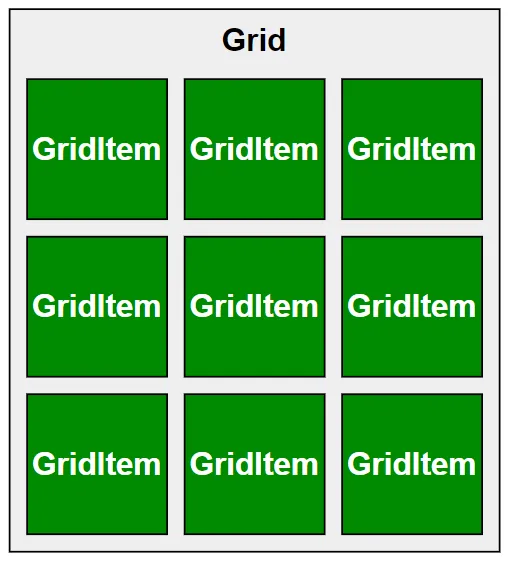
网格布局的容器组件为 Grid,子组件为 GridItem,具体语法如下
代码
Grid() { GridItem() { Text('GridItem') } GridItem() { Text('GridItem') } GridItem() { Text('GridItem') } GridItem() { Text('GridItem') } ...... } 效果
二、常用属性
2.1 划分网格
Grid组件支持自定义行数和列数以及每行和每列的尺寸大小,上述内容需要使用rowsTemplate()方法和columnsTemplate()方法进行设置,具体用法如下
代码
Grid() { ForEach([1, 2, 3, 4, 5, 6, 7, 8, 9], (item) => { GridItem() { Text(item.toString()) .itemTextStyle() } }) } .width(320) .height(240) .rowsTemplate('1fr 1fr 1fr') .columnsTemplate('1fr 2fr 1fr') .gridStyle() 效果
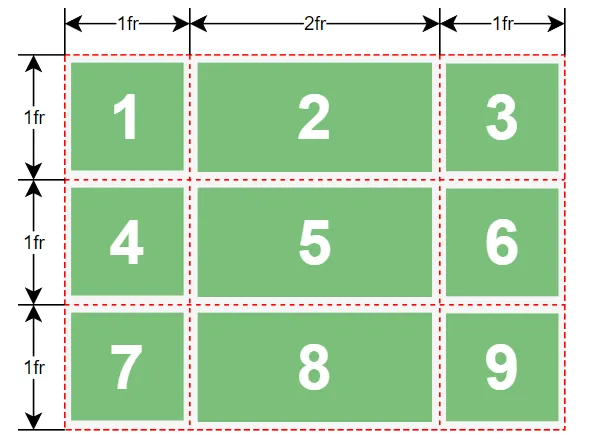
说明:
fr为 fraction(比例、分数) 的缩写。fr的个数表示网格布局的行数或列数,fr前面的数值大小,表示该行或列的尺寸占比。
示例代码
pages/layout目录下新建grid目录,新建GridBasic.ets文件
@Entry @Component struct GridBasic { build() { Column() { Grid() { ForEach([1, 2, 3, 4, 5, 6, 7, 8, 9], (item) => { GridItem() { Text(item.toString()) .itemTextStyle12() } }) } .width(320) .height(240) .rowsTemplate('1fr 1fr 1fr') .columnsTemplate('1fr 2fr 1fr') .gridStyle12() }.width('100%') .height('100%') .justifyContent(FlexAlign.Center) } } @Extend(Text) function itemTextStyle12() { .height('100%') .width('100%') .textAlign(TextAlign.Center) .fontColor(Color.White) .fontSize(40) .fontWeight(FontWeight.Bold) .backgroundColor('#008a00') .borderWidth(1) } @Extend(Grid) function gridStyle12() { .backgroundColor('#f5f5f5') .borderWidth(1) } 2.2 子组件所占行列数
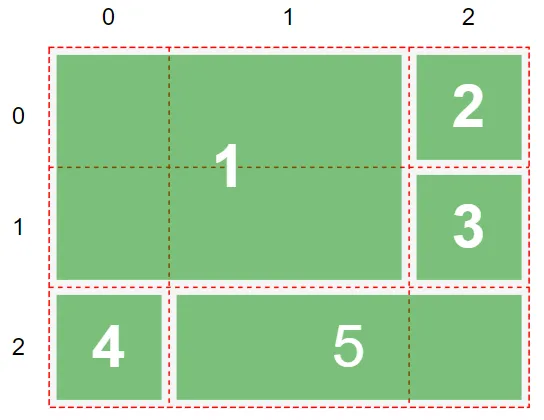
GridItem组件支持横跨几行或者几列,如下图所示
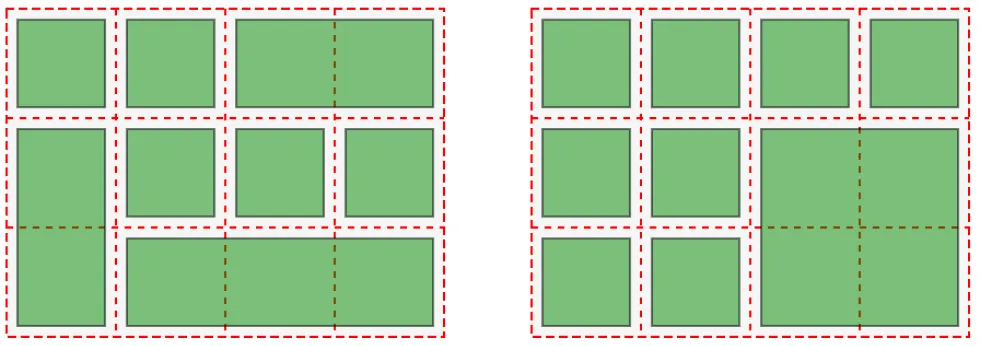
可以使用columnStart()、columnEnd()、rowStart()和rowEnd()方法设置 GridItem 组件所占的单元格,其中rowStart和rowEnd属性表示当前子组件的起始行号和终点行号,columnStart和columnEnd属性表示指定当前子组件的起始列号和终点列号。
说明:
Grid容器中的行号和列号均从0开始。
具体用法如下
代码:
Grid() { GridItem() { Text('1') .itemTextStyle() }.rowStart(0).rowEnd(1).columnStart(0).columnEnd(1) GridItem() { Text('2') .itemTextStyle() } GridItem() { Text('3') .itemTextStyle() } GridItem() { Text('4') .itemTextStyle() } GridItem() { Text('5') .itemTextStyle() }.columnStart(1).columnEnd(2) } .width(320) .height(240) .rowsTemplate('1fr 1fr 1fr') .columnsTemplate('1fr 2fr 1fr') .gridStyle() 效果:
示例代码
pages/layout/grid目录,新建StartAndEndPage.ets文件
@Entry @Component struct StartAndEndPage { build() { Column() { Grid() { GridItem() { Text('1') .itemTextStyle13() }.rowStart(0).rowEnd(1).columnStart(0).columnEnd(1) GridItem() { Text('2') .itemTextStyle13() } GridItem() { Text('3') .itemTextStyle13() } GridItem() { Text('4') .itemTextStyle13() } GridItem() { Text('5') .itemTextStyle13() }.columnStart(1).columnEnd(2) } .width(320) .height(240) .rowsTemplate('1fr 1fr 1fr') .columnsTemplate('1fr 2fr 1fr') .gridStyle13() }.width('100%') .height('100%') .justifyContent(FlexAlign.Center) } } @Extend(Text) function itemTextStyle13() { .height('100%') .width('100%') .textAlign(TextAlign.Center) .fontColor(Color.White) .fontSize(40) .fontWeight(FontWeight.Bold) .backgroundColor('#008a00') .borderWidth(1) } @Extend(Grid) function gridStyle13() { .backgroundColor('#f5f5f5') .borderWidth(1) } 2.3 行列间距
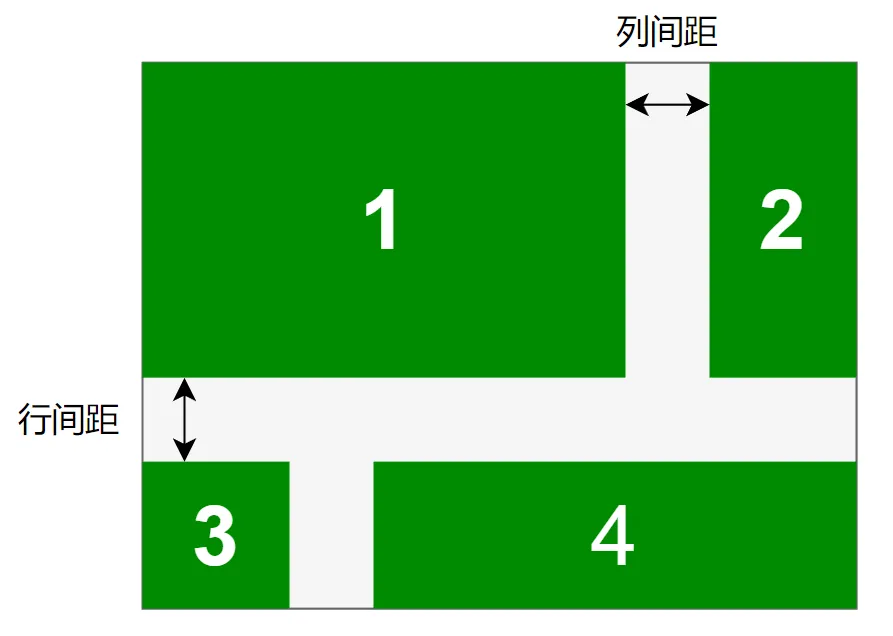
使用rowsGap()和columnsGap()属性,可以控制行列间距,具体用法如下
代码
Grid() { ...... } .columnsGap(20) .rowsGap(20) 效果
示例代码
pages/layout/grid目录,新建GridGap.ets文件
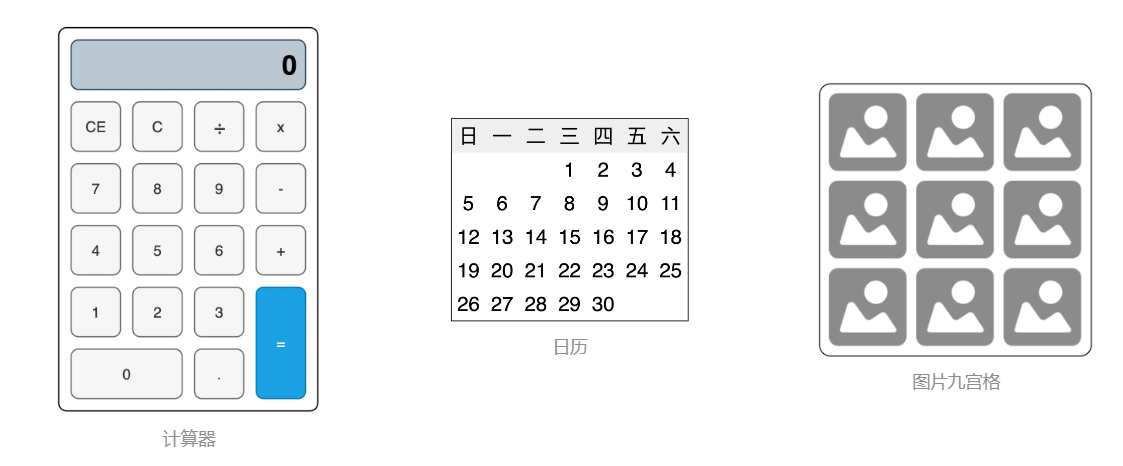
@Entry @Component struct GridGap { build() { Column() { Grid() { GridItem() { Text('1') .itemTextStyle14() }.rowStart(0).rowEnd(1).columnStart(0).columnEnd(1) GridItem() { Text('2') .itemTextStyle14() }.rowStart(0).rowEnd(1) GridItem() { Text('3') .itemTextStyle14() } GridItem() { Text('4') .itemTextStyle14() }.columnStart(1).columnEnd(2) } .width(320) .height(240) .rowsTemplate('1fr 1fr 1fr') .columnsTemplate('1fr 2fr 1fr') .gridStyle14() .rowsGap(20) .columnsGap(20) }.width('100%') .height('100%') .justifyContent(FlexAlign.Center) } } @Extend(Text) function itemTextStyle14() { .height('100%') .width('100%') .textAlign(TextAlign.Center) .fontColor(Color.White) .fontSize(40) .fontWeight(FontWeight.Bold) .backgroundColor('#008a00') .borderWidth(1) } @Extend(Grid) function gridStyle14() { .backgroundColor('#f5f5f5') .borderWidth(1) } 三、计算器案例
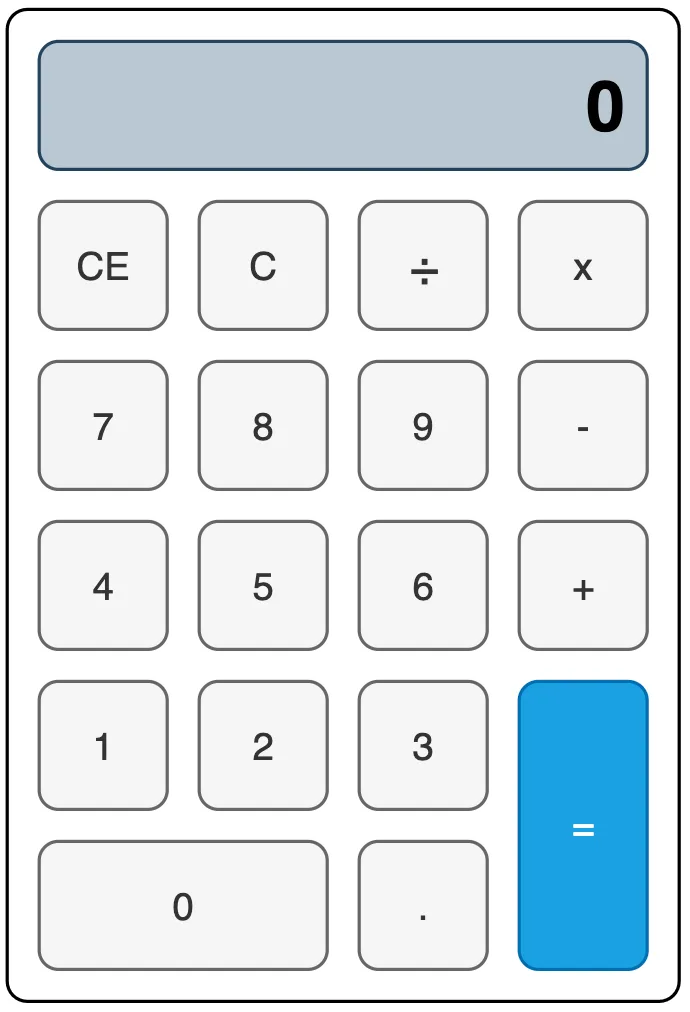
使用网格布局实现如下布局效果
示例代码
pages/layout/grid目录,新建CalculatorPage.ets文件
@Entry @Component struct CalculatorPage { build() { Column() { Grid() { GridItem() { Text('0') .screenTextStyle() }.columnStart(0).columnEnd(3) GridItem() { Text('CE') .buttonTextStyle() } GridItem() { Text('C') .buttonTextStyle() } GridItem() { Text('÷') .buttonTextStyle() } GridItem() { Text('x') .buttonTextStyle() } GridItem() { Text('7') .buttonTextStyle() } GridItem() { Text('8') .buttonTextStyle() } GridItem() { Text('9') .buttonTextStyle() } GridItem() { Text('-') .buttonTextStyle() } GridItem() { Text('4') .buttonTextStyle() } GridItem() { Text('5') .buttonTextStyle() } GridItem() { Text('6') .buttonTextStyle() } GridItem() { Text('+') .buttonTextStyle() } GridItem() { Text('1') .buttonTextStyle() } GridItem() { Text('2') .buttonTextStyle() } GridItem() { Text('3') .buttonTextStyle() } GridItem() { Text('=') .buttonTextStyle() .backgroundColor('#1aa1e2') }.rowStart(4).rowEnd(5) GridItem() { Text('0') .buttonTextStyle() }.columnStart(0).columnEnd(1) GridItem() { Text('.') .buttonTextStyle() } } .gridStyle15() .rowsTemplate('1fr 1fr 1fr 1fr 1fr 1fr') .columnsTemplate('1fr 1fr 1fr 1fr') }.width('100%') .height('100%') .justifyContent(FlexAlign.Center) } } @Extend(Text) function screenTextStyle() { .backgroundColor('#bac8d3') .height('100%') .width('100%') .textAlign(TextAlign.End) .padding(10) .borderRadius(10) .borderWidth(1) .fontSize(40) .fontWeight(FontWeight.Bold) } @Extend(Text) function buttonTextStyle() { .backgroundColor('#f5f5f5') .height('100%') .width('100%') .textAlign(TextAlign.Center) .padding(10) .borderRadius(10) .borderWidth(1) .fontSize(25) } @Extend(Grid) function gridStyle15() { .width(320) .height(480) .borderRadius(10) .borderWidth(1) .padding(10) .rowsGap(10) .columnsGap(10) } 《鸿蒙应用开发从入门到项目实战》系列文章持续更新中,陆续更新AI+编程、企业级项目实战等原创内容,防止迷路,欢迎关注!


