
一、概述
uni-app x 提供了 uni.request() 方法。
uni.request({ url: 'https://api.example.com', method: 'GET' })
在实际项目开发中,直接使用 uni.request 会带来诸多问题,例如:
- 重复代码多(如每次都要写 baseURL)
- 错误处理分散,难以统一管理
- 缺乏请求/响应拦截能力
- Token 注入繁琐
- Loading 状态管理混乱
为了解决这些问题,封装一个统一的 HTTP 请求库是企业级开发的最佳实践。
二、封装request
uview-plus 自带一个 http 模块,但是在实际项目中,还是要自己封装一个,统一管理。
在项目根目录创建utils目录,在里面创建request.ts。 注意:文件后缀必须是ts,而不是js
// utils/request.ts import { http } from 'uview-plus' /* 1. 全局配置 */ http.setConfig((config) => { config.baseURL = 'https://api.example.com' // api地址 config.timeout = 8000 // 单位毫秒,对应8秒 config.loadingText = '加载中...' config.loading = true // 开启 loading 动画 return config }) /* 2. 请求拦截 */ http.interceptors.request.use((config) => { const token = uni.getStorageSync('token') if (token) config.header.Authorization = `Bearer ${token}` return config }) /* 3. 响应拦截 */ http.interceptors.response.use( (response) => response.data, (err) => { // 🔥 强制断言,让 UTS 闭嘴 (uni as any).$u.toast(err.message || '网络错误') return Promise.reject(err) } ) export default http
修改 main.uts,引入 request,并挂载为全局属性$http
import App from './App.uvue' import { createSSRApp } from 'vue' import uviewPlus from 'uview-plus' /* 1. 引入 request(里面已经初始化好 http) */ import http from '@/utils/request' export function createApp() { const app = createSSRApp(App) /* 2. 挂到全局属性 */ app.config.globalProperties.$http = http app.use(uviewPlus) return { app } }
三、使用request
由于在main.uts挂载了全局属性,因此在pages里面的uvue文件,就可以直接调用了。比如:
get请求
const res = await this.$http.get('/test', {})
post请求
const res = await this.$http.post('/login', { username: 'admin', password: 123456 })
post请求,增加成功和失败处理
async login() { try { /* === 成功分支 === */ const res = await this.$http.post('/login', { username: 'admin', password: '123456' }) // 这里只写“成功后的业务” uni.setStorageSync('token', res.token) this.$u.toast('登录成功') uni.switchTab({ url: '/pages/index/index' }) } catch (err: any) { /* === 失败分支 === */ // 拦截器已弹通用提示,这里可做“额外”处理 console.error('登录失败', err) if (err.statusCode === 401) { this.$u.toast('账号或密码错误') } } }
post请求,局部请求不想显示 loading
await this.$http.post('/log', data, { loading: false })
uview-plus 的 http 模块已经内置了 “请求开始自动显示 loading,响应结束自动隐藏” 的机制,
你只需要 把 loading 开关打开 即可,成功/失败/超时都会 统一自动关闭,无需手动处理。
效果:
调用 this.$http.get/post 瞬间 → 出现 uview-plus 的 loading 遮罩
请求 成功/失败/超时 → 遮罩 自动消失(由 uview 内部 finally 关闭)
无需自己 uni.showLoading() / uni.hideLoading()
post请求,增加header
await this.$http.post('/upload', body, { header: { 'Content-Type': 'application/x-wwwz-form-urlencoded', 'X-Custom': 'abc123' } })
put请求
const res = await this.$http.put('/test', {id:1})
delete请求
const res = await this.$http.delete('/test', {id:1})
四、登录页面
login.uvue
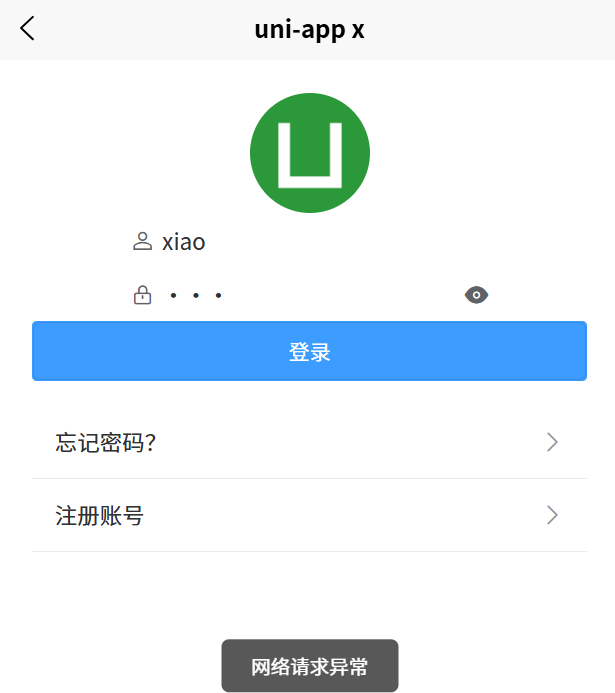
<template> <view class=""> <!-- 导航栏 --> <u-navbar title="用户登录" /> <!-- 内容区 --> <view class="content"> <!-- 头像 --> <u-avatar :src="logo" size="80"></u-avatar> <!-- 表单 --> <u--form :model="form" labelPosition="left"> <u--input v-model="form.username" placeholder="请输入用户名" prefixIcon="account" /> <u--input v-model="form.password" placeholder="请输入密码" type="password" prefixIcon="lock" /> </u--form> <!-- 按钮 --> <u-button text="登录" type="primary" @click="login" /> <!-- 链接 --> <view class="links"> <u-cell title="忘记密码?" isLink @click="gotoForget" /> <u-cell title="注册账号" isLink @click="gotoRegister" /> </view> </view> </view> </template> <script> export default { data() { return { title: 'Hello', logo: '/static/logo.png', form: { username: '', password: '', } } }, onLoad() { }, methods: { async login() { if (!this.form.username) { uni.showToast({ title: '请输入用户名', icon: 'none' }) return } // 请求登录接口 try { /* === 成功分支 === */ const res = await this.$http.post('/login', { username: this.form.username, password: this.form.password }) // 这里只写“成功后的业务” uni.setStorageSync('token', res.token) this.$u.toast('登录成功') uni.switchTab({ url: '/pages/index/index' }) } catch (err : any) { /* === 失败分支 === */ // 拦截器已弹通用提示,这里可做“额外”处理 console.error('登录失败', err) if (err.statusCode === 401) { this.$u.toast('账号或密码错误') } this.$u.toast('网络请求异常') } }, gotoForget() { uni.navigateTo({ url: '/pages/forget/index' }) }, gotoRegister() { uni.navigateTo({ url: '/pages/register/index' }) } } } </script> <style scoped> .content { padding: 40rpx; display: flex; flex-direction: column; align-items: center; } .links { margin-top: 30rpx; width: 100%; } </style>
效果如下:

针对大型项目,可以在utils里面新建一个api.ts,用来编写一些公用业务函数,例如:
import http from './request.js' /* 登录 */ export const login = (username, pwd) => http.post('/login', { username, pwd }) /* 轮播图 */ export const getBanner = () => http.get('/banner') /* 商品列表 */ export const getGoods = (params) => http.get('/goods', { params })
然后在pages里面的页面,就可以调用了,无需重复写函数。
<script> import { getBanner } from '@/utils/api.ts' export default { data() { return { title: 'Hello', bannerList: [], } }, onLoad() { this.getbannerList() }, methods: { async getbannerList() { /* 直接调用 */ this.bannerList = await getBanner() }, } } </script>
注意:直接调用,要用异步,函数名前面加async


![洛谷 P11345 [KTSC 2023 R2] 基地简化 题解](http://www.itfaba.com/wp-content/themes/kemi/timthumb.php?src=http://www.itfaba.com/wp-content/themes/kemi/img/random/2.jpg&w=218&h=124&zc=1)
