
Rust 语言中,trait 是一个非常重要的概念,可以包含:函数、常量、类型等。
通俗一点理解,trait 以一种抽象的方式定义共享的行为,可以被认为是一些语言的接口,但是与接口也有一定区别,下面会介绍。
1、成员方法
trait 中可以定义方法。
trait Shape { fn area(&self) -> f64; } 我们在一个名为 Shape 的 trait 中定义了一个方法 area。
1.1 方法参数
看上面定义的 Shape,方法的参数是 &self。
其实对于每个 trait 都有一个隐藏的类型 Self(大写的 S),代表实现此 trait 的具体类型。
Rust 中 Self 和 self 都是关键字,大写的Self是类型名,小写的 self 是变量名。
其实 area(&self) 等价于 area(self : &Self),只不过 rust 提供了简化的写法。
下面几种情况都是等价的。
trait T { fn method1(self : Self); fn method2(self : &Self); fn method3(self : &mut Self); } //等价于下面方法定义 trait T { fn method1(self); fn method2(&self); fn method3(&mut self); } 1.2 调用实例
可以参考如下例子:
trait Shape { fn area(&self) -> f64; } struct Circle { radius : f64, } impl Shape for Circle { // Self 的类型就是 Circle fn area(self : &Self) -> f64{ // 可以通过self.radius访问成员变量 std::f64::consts::PI * self.radius * self.radius } } fn main() { let circle = Circle{ radius : 2f64}; println!("The area is {}",circle.area()) } ①、通过 self.成员变量 来访问成员变量;
②、通过 实例.成员方法 来调用成员方法;
2、匿名 trait
impl Circle { fn get_radius(&self) -> f64 { self.radius } } impl 关键字后面直接接类型,没有 trait 的名字。
可以将上面代码看成是为 Circle 实现了一个匿名的 trait。
3、 静态方法
静态方法:第一个参数不是 self 参数的方法。
impl Circle { // 普通方法 fn get_radius(&self) -> f64 { self.radius } // 静态方法 fn get_area(this : &Self) ->f64 { std::f64::consts::PI * this.radius * this.radius } } fn main() { let c = Circle{ radius : 2f64}; // 调用普通方法 println!("The radius is {}",c.radius); // 调用静态方法 println!("The area is {}",Circle::get_area(&c)) } 注意和普通方法的区别,参数命名不同,以及调用方式不同(普通方法是小数 实例.方法 ,静态方法是 类型::方法 )。
静态方法的调用可以 Type::FunctionName()。
4、扩展方法
利用 trait 给其它类型添加方法。
比如我们给内置类型 i32 添加一个方法:
// 扩展方法 trait Double { fn double(&self) -> Self; } impl Double for i32 { fn double(&self) -> i32{ self * 2 } } fn main() { let x : i32 = 10.double(); println!("x double is {}",x);//20 } 5、泛型约束
在Rust中,静态分发(Static Dispatch)和动态分发(Dynamic Dispatch)是用于选择和调用函数的两种不同的机制。
5.1 静态分发
在编译时确定函数调用的具体实现。
它通过在编译阶段解析函数调用并选择正确的函数实现,从而实现高效的调用。
静态分发通常适用于使用泛型的情况,其中编译器可以根据具体的类型参数确定调用的函数。
fn main() { fn myPrint<T: ToString>(v: T) { v.to_string(); } let c = 'a'; let s = String::from("hello"); myPrint::<char>(c); myPrint::<String>(s); } 等价于:
fn myPrint(c:char){ c.to_string(); } fn myPrint(str:String){ str.to_string(); } 5.2 动态分发
在运行时根据对象的实际类型来选择函数的实现。
它适用于使用trait对象(通过使用dyn关键字)的情况,其中编译器在编译阶段无法确定具体的函数实现。
在运行时,程序会根据trait对象所包含的实际类型来动态地选择要调用的函数。
动态分发提供了更大的灵活性,但相对于静态分发,它可能会带来一些运行时开销。
下面代码分别演示静态分发和动态分发的区别:
trait Animal { fn make_sound(&self); } struct Cat; struct Dog; impl Animal for Cat { fn make_sound(&self) { println!("Meow!"); } } impl Animal for Dog { fn make_sound(&self) { println!("Woof!"); } } fn static_dispatch(animal: &impl Animal) { animal.make_sound(); } fn dynamic_dispatch(animal: &dyn Animal) { animal.make_sound(); } fn main() { let cat = Cat; let dog = Dog; // 静态分发 static_dispatch(&cat); static_dispatch(&dog); // 动态分发 dynamic_dispatch(&cat as &dyn Animal); dynamic_dispatch(&dog as &dyn Animal); } 5、一致性原则
一致性原则,也称为孤儿原则(Orphan Rule):
Impl 块要么与 trait 块的声明在同一个 crate 中,要么与类型的声明在同一个 crate 中。
孤儿原则(Orphan Rule)是Rust语言中的一项重要设计原则,它有助于确保trait实现的可控性和可追溯性。遵守孤儿原则可以提高代码的可读性和可维护性,并降低潜在的冲突和混乱。
也就是说如果 trait 来自外部,而且类型也来自外部 crate,编译器是不允许你为这个类型 impl 这个 trait。它们当中至少有一个是在当前 crate 中定义的。
比如下面两种情况都是可以的:
use std::fmt::Display; struct A; impl Display for A {} trait TraitA {} impl TraitA for u32 {} 但是下面这种情况就不可以:
use std::fmt::Display; impl Display for u32 {} 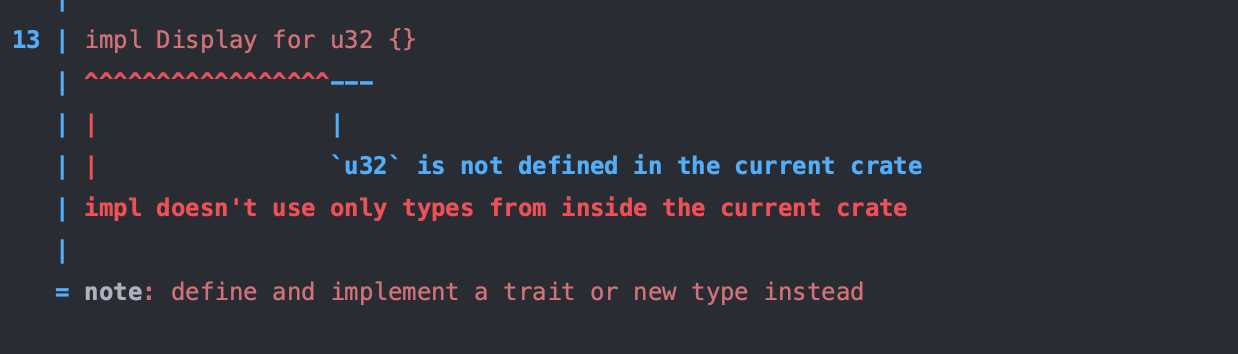
这也给我们提供了一个标准:上游开发者在写库的时候,一些比较常用的标准 trait,如 Display/Debug/ToString/Default 等,应该尽可能的提供好。
否则下游使用这个库的开发者是没法帮我们实现这些 trait 的。
6、trait 和 接口区别
开篇我们说为了便于理解 trait,可以想象为其它语言,比如Java中的接口。但是实际上他们还是有很大的区别的。
因为 rust 是一种用户可以对内存有着精确控制的强类型语言。在目前 Rust 版本中规定:
函数传参类型,返回值类型等都是要在编译期确定大小的。
而 trait 本身既不是具体类型,也不是指针类型,它只是定义了针对类型的、抽象的约束。不同的类型可以实现同一个 trait,满足同一个 trait 的类型可能具有不同的大小。
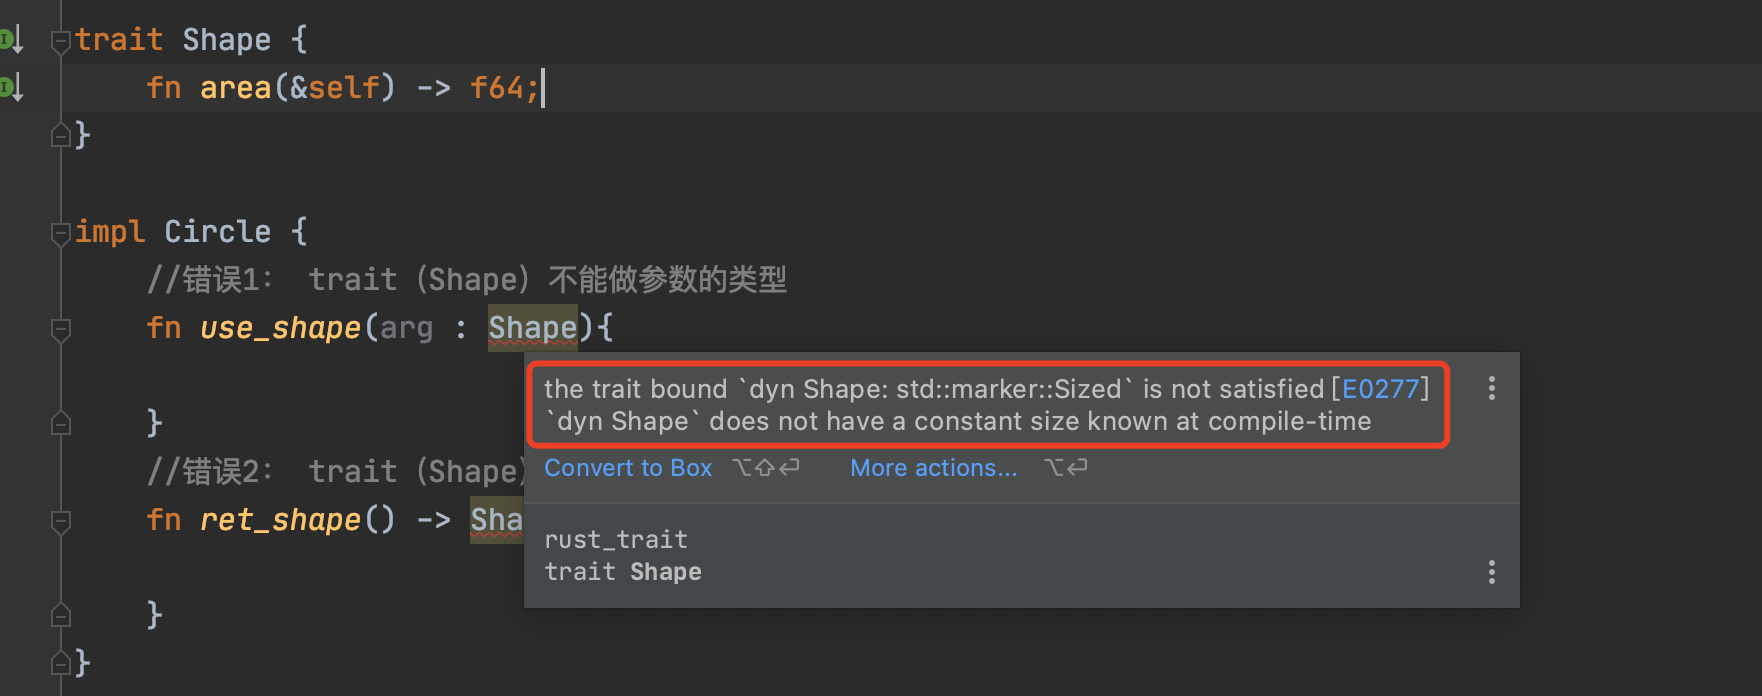
所以 trait 在编译阶段没有固定的大小,我们不能直接使用 trait 作为实例变量、参数以及返回值。
类似下面的写法都是错误的:
trait Shape { fn area(&self) -> f64; } impl Circle { //错误1: trait(Shape)不能做参数的类型 fn use_shape(arg : Shape){ } //错误2: trait(Shape)不能做返回值的类型 fn ret_shape() -> Shape{ } } fn main() { // 错误3:trait(Shape)不能做局部变量的类型 let x : Shape = Circle::new(); } 可以看到编译器的错误提示:
7、derive
Rust 标准库内部实现了一些逻辑较为固定的 trait,通过 derive 配置可以帮助我们自动 impl 某些 trait,而无需手动编写对应的代码。
#[derive(Debug)] struct Foo { data : i32, } fn main() { let v1 = Foo{data : 0}; println!("{:?}",v1) } 加上 Debug 的trait 实现,便于格式化打印 struct。
[derive(Debug)] 等价于 impl Debug for Foo {}
目前,Rust 支持的可以自动 derive 的 trait 有如下:
Copy,Clone,Default,Hash, Debug,PartialEq,Eq,PartialOrd, Ord,RustcEncodable,RustcDecodable, FromPrimitive,Send,Sync 8、标准库中常见 trait
在介绍 derive 时,我们说明了内置的一些 trait,这都是标准库中比较常见的 trait,下面我们分别介绍这些 trait 是干什么的。
8.1 Display 和 Debug
可以分别看下源码定义:
【Display】
pub trait Display { /// Formats the value using the given formatter. /// /// # Examples /// /// ``` /// use std::fmt; /// /// struct Position { /// longitude: f32, /// latitude: f32, /// } /// /// impl fmt::Display for Position { /// fn fmt(&self, f: &mut fmt::Formatter<'_>) -> fmt::Result { /// write!(f, "({}, {})", self.longitude, self.latitude) /// } /// } /// /// assert_eq!("(1.987, 2.983)", /// format!("{}", Position { longitude: 1.987, latitude: 2.983, })); /// ``` #[stable(feature = "rust1", since = "1.0.0")] fn fmt(&self, f: &mut Formatter<'_>) -> Result; } 【Debug】
pub trait Debug { /// Formats the value using the given formatter. /// /// # Examples /// /// ``` /// use std::fmt; /// /// struct Position { /// longitude: f32, /// latitude: f32, /// } /// /// impl fmt::Debug for Position { /// fn fmt(&self, f: &mut fmt::Formatter<'_>) -> fmt::Result { /// f.debug_tuple("") /// .field(&self.longitude) /// .field(&self.latitude) /// .finish() /// } /// } /// /// let position = Position { longitude: 1.987, latitude: 2.983 }; /// assert_eq!(format!("{:?}", position), "(1.987, 2.983)"); /// /// assert_eq!(format!("{:#?}", position), "( /// 1.987, /// 2.983, /// )"); /// ``` #[stable(feature = "rust1", since = "1.0.0")] fn fmt(&self, f: &mut Formatter<'_>) -> Result; } ①、只有实现了 Display trait 的类型,才能够用 {} 格式打印出来。
②、只有实现了 Debug trait 的类型,才能够用{:?} {:#?} 格式打印出来。
这两者区别如下:
1、Display 假定了这个类型可以用 utf-8 格式的字符串表示,它是准备给最终用户看的,并不是所有的类型都应该或者能够实现这个 trait。这个 trait 的 fmt 应该如何格式化字符串,完全取决于程序员自己,编译器不提供自动 derive 的功能。
2、标准库中还有一个常用 trait 叫作 std::string::ToString,对于所有实现了 Display trait 的类型,都自动实现了这个 ToString trait 。它包含了一个方法 to_string(&self) -> String。任何一个实现了 Display trait 的类型,我们都可以对它调用 to_string() 方法格式化出一个字符串。
3、Debug 则主要是为了调试使用,建议所有的作为 API 的“公开”类型都应该实现这个 trait,以方便调试。它打印出来的字符串不是以“美观易读”为标准,编译器提供了自动 derive 的功能。
struct Color{ r:u8, g:u8, b:u8, } impl Default for Color{ fn default() -> Self{ Self{r:0,g:0,b:0} } } 等价于:
#[derive(Default)] struct Color{ r:u8, g:u8, b:u8, } 8.2 ToString
ToString 是 Rust 标准库中定义的一个非常常用的 trait,它的目的是将任何实现了它的类型转换为 String 类型的文本表示
#[cfg_attr(not(test), rustc_diagnostic_item = "ToString")] #[stable(feature = "rust1", since = "1.0.0")] pub trait ToString { /// Converts the given value to a `String`. /// /// # Examples /// /// ``` /// let i = 5; /// let five = String::from("5"); /// /// assert_eq!(five, i.to_string()); /// ``` #[rustc_conversion_suggestion] #[stable(feature = "rust1", since = "1.0.0")] #[cfg_attr(not(test), rustc_diagnostic_item = "to_string_method")] fn to_string(&self) -> String; } 自动实现
虽然 ToString 是一个 trait,但你几乎不需要手动实现它,因为标准库中已经为所有实现了 Display 的类型,自动实现了 ToString。
也就是说:
实现了
Display⇒ 自动拥有.to_string()方法。
to_string()本质上等价于format!("{}", value)。
#[cfg(not(no_global_oom_handling))] #[stable(feature = "rust1", since = "1.0.0")] impl<T: fmt::Display + ?Sized> ToString for T { #[inline] fn to_string(&self) -> String { <Self as SpecToString>::spec_to_string(self) } } impl<T: fmt::Display + ?Sized> SpecToString for T { // A common guideline is to not inline generic functions. However, // removing `#[inline]` from this method causes non-negligible regressions. // See <https://github.com/rust-lang/rust/pull/74852>, the last attempt // to try to remove it. #[inline] default fn spec_to_string(&self) -> String { let mut buf = String::new(); let mut formatter = core::fmt::Formatter::new(&mut buf, core::fmt::FormattingOptions::new()); // Bypass format_args!() to avoid write_str with zero-length strs fmt::Display::fmt(self, &mut formatter) .expect("a Display implementation returned an error unexpectedly"); buf } } 8.3 ParitialEq/Eq
在Rust中,PartialOrd、Ord、PartialEq和Eq是用于比较和排序的trait。通过使用derive宏,可以自动为结构体或枚举实现这些trait的默认行为。
下面是对这些trait的简要解释:
PartialOrdtrait:用于部分顺序比较,即可以进行比较但不一定可以完全排序。它定义了partial_cmp方法,用于比较两个值并返回一个Option<Ordering>枚举,表示比较结果。Ordtrait:用于完全顺序比较,即可以进行完全排序。它是PartialOrdtrait的超集,定义了cmp方法,用于比较两个值并返回Ordering枚举,表示比较结果。PartialEqtrait:用于部分相等性比较。它定义了eq、ne、lt、le、gt和ge等方法,用于比较两个值是否相等、不相等、小于、小于等于、大于、大于等于。Eqtrait:用于完全相等性比较,即可以进行完全相等性判断。它是PartialEqtrait的超集,无需手动实现,通过自动实现PartialEqtrait即可获得Eqtrait的默认实现。
Eq定义为PartialEq的subtrait
#[derive(PartialEq, Debug)] // 注意这一句 struct Point { x: i32, y: i32, } fn example_assert(p1: Point, p2: Point) { assert_eq!(p1, p2); // 比较 } 8.4 PartialOrd/Ord
PartialOrd和PartialEq差不多,PartialEq只判断相等或不相等,PartialOrd在这个基础上进一步判断是小于、小于等于、大于还是大于等于。可以看到,它就是为排序功能准备的。
PartialOrd被定义为 PartialEq的subtrait。它们在类型上可以用过程宏一起derive实现。
#[derive(PartialEq, PartialOrd)] struct Point { x: i32, y: i32, } #[derive(PartialEq, PartialOrd)] enum Stoplight { Red, Yellow, Green, } 8.5 Clone
这个trait给目标类型提供了clone()方法用来完整地克隆实例。
#[stable(feature = "rust1", since = "1.0.0")] #[lang = "clone"] #[rustc_diagnostic_item = "Clone"] #[rustc_trivial_field_reads] pub trait Clone: Sized { /// Returns a copy of the value. /// /// # Examples /// /// ``` /// # #![allow(noop_method_call)] /// let hello = "Hello"; // &str implements Clone /// /// assert_eq!("Hello", hello.clone()); /// ``` #[stable(feature = "rust1", since = "1.0.0")] #[must_use = "cloning is often expensive and is not expected to have side effects"] // Clone::clone is special because the compiler generates MIR to implement it for some types. // See InstanceKind::CloneShim. #[lang = "clone_fn"] fn clone(&self) -> Self; /// Performs copy-assignment from `source`. /// /// `a.clone_from(&b)` is equivalent to `a = b.clone()` in functionality, /// but can be overridden to reuse the resources of `a` to avoid unnecessary /// allocations. #[inline] #[stable(feature = "rust1", since = "1.0.0")] fn clone_from(&mut self, source: &Self) { *self = source.clone() } } 通过方法的签名,可以看到方法使用的是实例的不可变引用。
fn clone(&self) -> Self; 比如:
#[derive(Clone)] struct Point { x: u32, y: u32, } 因为每一个字段(u32类型)都实现了Clone,所以通过derive,自动为Point类型实现了Clone trait。实现后,Point的实例 point 使用 point.clone() 就可以把自己克隆一份了。
注意:clone() 是对象的深度拷贝,可能会有比较大的额外负载,但是就大多数情况来说其实还好。不要担心在Rust中使用clone(),先把程序功能跑通最重要。Rust的代码,性能一般都不会太差,毕竟起点很高。
8.6 Copy
#[rustc_unsafe_specialization_marker] #[rustc_diagnostic_item = "Copy"] pub trait Copy: Clone { // Empty. } 定义为Clone的subtrait,并且不包含任何内容,仅仅是一个标记(marker)。
Rust标准库提供了Copy过程宏,可以让我们自动为目标类型实现Copy trait。
8.7 ToOwned
ToOwned相当于是Clone更宽泛的版本。ToOwned给类型提供了一个 to_owned() 方法,可以将引用转换为所有权实例。
let a: &str = "123456"; let s: String = a.to_owned(); 8.8 Drop
Drop trait用于给类型做自定义垃圾清理(回收)。
trait Drop { fn drop(&mut self); } 实现了这个trait的类型的实例在走出作用域的时候,触发调用drop()方法,这个调用发生在这个实例被销毁之前。
#[derive(PartialEq, Debug, Clone)] // 注意这一句 struct Point { x: i32, y: i32, } impl Drop for Point { fn drop(&mut self) { println!("Dropping point ({},{})",self.x,self.y); } } fn main() { let p = Point { x: 1, y: 2 }; println!("{:?}", p); } 输出结果:

一般来说,我们不需要为自己的类型实现这个trait,除非遇到特殊情况,比如我们要调用外部的C库函数,然后在C那边分配了资源,由C库里的函数负责释放,这个时候我们就要在Rust的包装类型(对C库中类型的包装)上实现Drop,并调用那个C库中释放资源的函数。
8.9 From<T> 和 Into<T>
这两个 trait 用于类型转换。
From<T> 可以把类型T转为自己,而 Into<T> 可以把自己转为类型T。
trait From<T> { fn from(T) -> Self; } trait Into<T> { fn into(self) -> T; } 可以看到它们是互逆的trait。实际上,Rust只允许我们实现 From<T>,因为实现了From后,自动就实现了Into,请看标准库里的这个实现。
impl<T, U> Into<U> for T where U: From<T>, { fn into(self) -> U { U::from(self) } } 8.10 TryFrom TryInto
TryFrom<T> 和 TryInto<T> 是 From<T> 和 Into<T> 的可失败版本。如果你认为转换可能会出现失败的情况,就选择这两个trait来实现。
trait TryFrom<T> { type Error; fn try_from(value: T) -> Result<Self, Self::Error>; } trait TryInto<T> { type Error; fn try_into(self) -> Result<T, Self::Error>; } 可以看到,调用 try_from() 和 try_into() 后返回的是Result,你需要对Result进行处理。
8.11 FromStr
从字符串类型转换到自身。
trait FromStr { type Err; fn from_str(s: &str) -> Result<Self, Self::Err>; } 比如字符串的 parse() 方法:
use std::str::FromStr; fn example<T: FromStr>(s: &str) { // 下面4种表达等价 let t: Result<T, _> = FromStr::from_str(s); let t = T::from_str(s); let t: Result<T, _> = s.parse(); let t = s.parse::<T>(); // 最常用的写法 } 8.12 as_ref
trait AsRef<T> { fn as_ref(&self) -> &T; } 它把自身的引用转换成目标类型的引用。和Deref的区别是, deref() 是隐式调用的,而 as_ref() 需要你显式地调用。所以代码会更清晰,出错的机会也会更少。
AsRef<T> 可以让函数参数中传入的类型更加多样化,不管是引用类型还是具有所有权的类型,都可以传递。比如;
// 使用 &str 作为参数可以接收下面两种类型 // - &str // - &String fn takes_str(s: &str) { // use &str } // 使用 AsRef<str> 作为参数可以接受下面三种类型 // - &str // - &String // - String fn takes_asref_str<S: AsRef<str>>(s: S) { let s: &str = s.as_ref(); // use &str } fn example(slice: &str, borrow: &String, owned: String) { takes_str(slice); takes_str(borrow); takes_str(owned); // ❌ takes_asref_str(slice); takes_asref_str(borrow); takes_asref_str(owned); // ✅ } 在这个例子里,具有所有权的String字符串也可以直接传入参数中了,相对于 &str 的参数类型表达更加扩展了一步。
你可以把 Deref 看成是隐式化(或自动化)+弱化版本的 AsRef<T>。


![洛谷 P11345 [KTSC 2023 R2] 基地简化 题解](http://www.itfaba.com/wp-content/themes/kemi/timthumb.php?src=http://www.itfaba.com/wp-content/themes/kemi/img/random/3.jpg&w=218&h=124&zc=1)
