
手机云控 Windows 电脑锁屏
背景
在工作时,常会遇到这么一个场景:坐在电脑前办公,突然被叫了出去,可能出去只有一两分钟或几分钟,因此我不会将电脑锁屏,同时由于常用电脑做一些前台任务,电脑也不设置自动锁屏,但中断事件的时间是无法确定的,如果几十分钟甚至一两个小时还不回来,不锁屏的电脑无异于一台任人抚摸的小猫——吸引人且无力防御。
设计思路
反复几次后,我就萌生了写一个能远程云控电脑锁屏的小工具的想法,那样我只要在手机上设置一下锁屏,办公室的电脑就能自动锁屏了。思路也很简单:
flowchart TD A[用户操作] -->|云端控制台设置锁屏状态| B[发送锁屏状态至服务器] B --> C{服务器} C -->|存储状态| D[被控电脑] D -->|定期查询服务器状态| E{状态判断} E -->|“锁屏”| F[执行锁屏操作] E -->|“未锁屏”| G[保持当前状态] F --> D G --> D
实现方案
按照上述思路,实现起来就很简单了。可以拆分成以下几个小步骤:
- 写一个云控控制台,能在手机上访问
- 云端控制器能存储当前状态,并供受控端读取
- 写一个锁屏器,在受控电脑上安装,自动获取云端当前状态,并实现锁屏操作
具体实现如下:
- 云端控制台为了让通用性更强,且更简化、更快捷实现,选择了网页端来部署,没有选择用 APP,不然还要考虑 Android/IOS/Mac 等各大系统适配。
- 状态存储器用 php 实现,原因:代码简单易写,服务器方便部署且通用性强。
- 锁屏器用 golang 来写,最初考虑过 Python,但综合考量打包体积、跨设备兼容和交叉编译支持情况,还是选择了 golang。
实现代码
云端控制台,一个 html 静态小网页
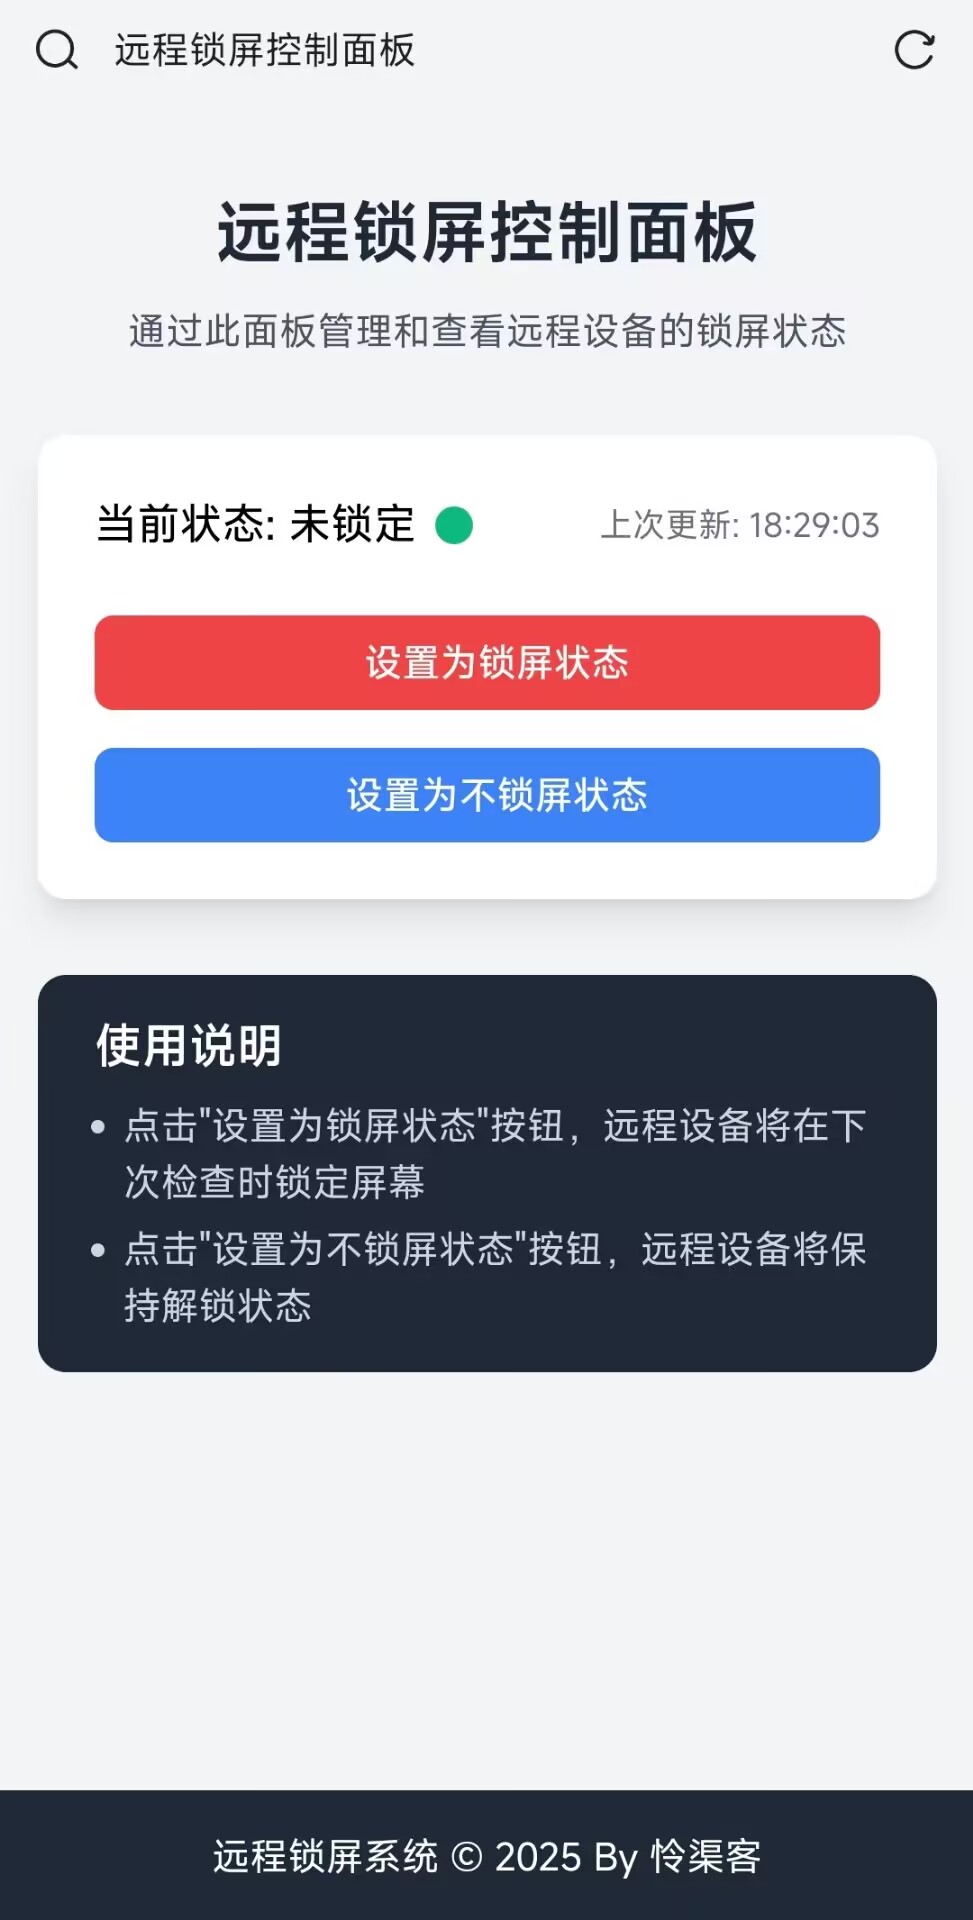
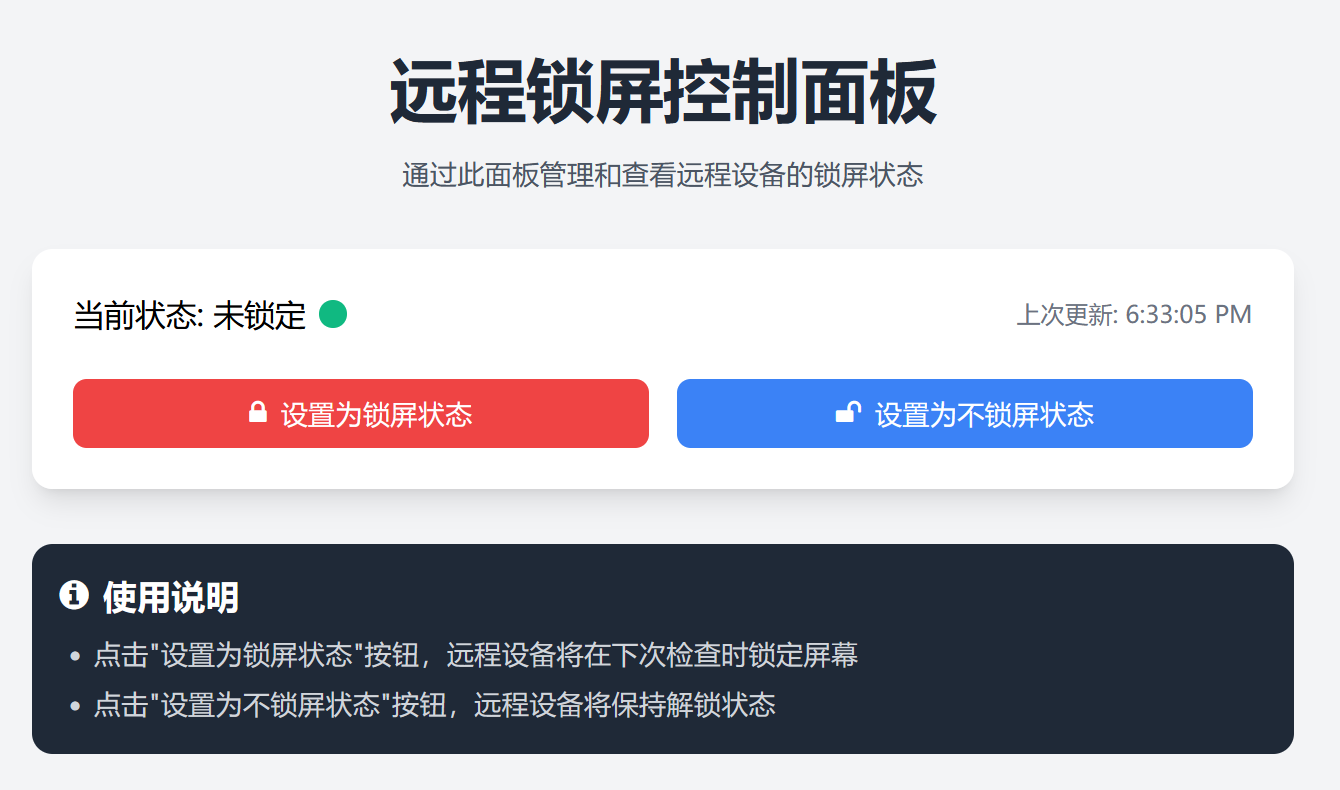
<!DOCTYPE html> <html lang="zh-CN"> <head> <meta charset="UTF-8"> <meta name="viewport" content="width=device-width, initial-scale=1.0"> <title>远程锁屏控制面板 - 怜渠客</title> <script src="https://cdn.tailwindcss.com"></script> <link href="https://cdn.jsdelivr.net/npm/font-awesome@4.7.0/css/font-awesome.min.css" rel="stylesheet"> <script> tailwind.config = { theme: { extend: { colors: { primary: '#3B82F6', secondary: '#10B981', danger: '#EF4444', }, fontFamily: { sans: ['Inter', 'system-ui', 'sans-serif'], }, } } } </script> <style type="text/tailwindcss"> @layer utilities { .content-auto { content-visibility: auto; } .btn { @apply px-4 py-2 rounded-lg font-medium transition-all duration-300 transform hover:scale-105 focus:outline-none focus:ring-2 focus:ring-opacity-50; } .btn-primary { @apply bg-primary text-white focus:ring-primary; } .btn-danger { @apply bg-danger text-white focus:ring-danger; } .status-indicator { @apply w-4 h-4 rounded-full inline-block mx-2 transition-all duration-500; } .status-indicator-locked { @apply bg-danger; } .status-indicator-unlocked { @apply bg-secondary; } } </style> </head> <body class="bg-gray-100 min-h-screen flex flex-col"> <div class="container mx-auto px-4 py-8 max-w-3xl"> <header class="text-center mb-8"> <h1 class="text-[clamp(1.8rem,4vw,2.5rem)] font-bold text-gray-800">远程锁屏控制面板</h1> <p class="text-gray-600 mt-2">通过此面板管理和查看远程设备的锁屏状态</p> </header> <div class="bg-white rounded-xl shadow-lg p-6 mb-8 transform transition-all duration-500 hover:shadow-xl"> <div class="flex items-center justify-between mb-6"> <div class="flex items-center"> <span id="status-text" class="text-lg font-medium">当前状态: 未锁定</span> <span id="status-indicator" class="status-indicator status-indicator-unlocked"></span> </div> <span id="last-updated" class="text-sm text-gray-500">上次更新: 刚刚</span> </div> <div class="grid grid-cols-1 md:grid-cols-2 gap-4"> <button id="lock-btn" class="btn btn-danger flex items-center justify-center"> <i class="fa fa-lock mr-2"></i> 设置为锁屏状态 </button> <button id="unlock-btn" class="btn btn-primary flex items-center justify-center"> <i class="fa fa-unlock mr-2"></i> 设置为不锁屏状态 </button> </div> <div id="message" class="mt-4 p-3 rounded-lg hidden transition-all duration-500"></div> </div> <div class="bg-gray-800 text-white rounded-xl p-4"> <h2 class="text-xl font-semibold mb-2 flex items-center"> <i class="fa fa-info-circle mr-2"></i> 使用说明 </h2> <ul class="list-disc pl-5 space-y-1 text-gray-300"> <li>点击"设置为锁屏状态"按钮,远程设备将在下次检查时锁定屏幕</li> <li>点击"设置为不锁屏状态"按钮,远程设备将保持解锁状态</li> </ul> </div> </div> <footer class="mt-auto py-4 bg-gray-800 text-white text-center"> <p>远程锁屏系统 © 2025 By 怜渠客</p> </footer> <script> // API端点 const API_URL = '###目标服务器地址###/state_query.php'; // DOM元素 const lockBtn = document.getElementById('lock-btn'); const unlockBtn = document.getElementById('unlock-btn'); const statusText = document.getElementById('status-text'); const statusIndicator = document.getElementById('status-indicator'); const lastUpdated = document.getElementById('last-updated'); const message = document.getElementById('message'); // 更新状态显示 function updateStatusDisplay(state) { if (state === '0') { statusText.textContent = '当前状态: 已锁定'; statusIndicator.className = 'status-indicator status-indicator-locked'; } else { statusText.textContent = '当前状态: 未锁定'; statusIndicator.className = 'status-indicator status-indicator-unlocked'; } const now = new Date(); const timeString = now.toLocaleTimeString(); lastUpdated.textContent = `上次更新: ${timeString}`; } // 显示消息 function showMessage(text, isError = false) { message.textContent = text; message.className = `mt-4 p-3 rounded-lg transition-all duration-500 ${ isError ? 'bg-red-100 text-red-700' : 'bg-green-100 text-green-700' }`; message.classList.remove('hidden'); // 3秒后隐藏消息 setTimeout(() => { message.classList.add('hidden'); }, 3000); } // 获取当前状态 async function fetchStatus() { try { const response = await fetch(`${API_URL}?ask=1`); if (!response.ok) { throw new Error(`HTTP错误,状态码: ${response.status}`); } const state = await response.text(); updateStatusDisplay(state.trim()); return state.trim(); } catch (error) { console.error('获取状态失败:', error); showMessage('获取状态失败,请稍后再试', true); return null; } } // 设置状态 async function setStatus(newState) { try { const response = await fetch(`${API_URL}?set=${newState}`); if (!response.ok) { throw new Error(`HTTP错误,状态码: ${response.status}`); } const result = await response.text(); showMessage(`状态已成功设置为: ${newState === '0' ? '锁定' : '未锁定'}`); // 立即刷新状态 fetchStatus(); } catch (error) { console.error('设置状态失败:', error); showMessage('设置状态失败,请稍后再试', true); } } // 事件监听器 lockBtn.addEventListener('click', () => setStatus('0')); unlockBtn.addEventListener('click', () => setStatus('1')); // 初始化页面 document.addEventListener('DOMContentLoaded', () => { // 立即获取一次状态 fetchStatus(); }); </script> </body> </html> 云端 php 代码
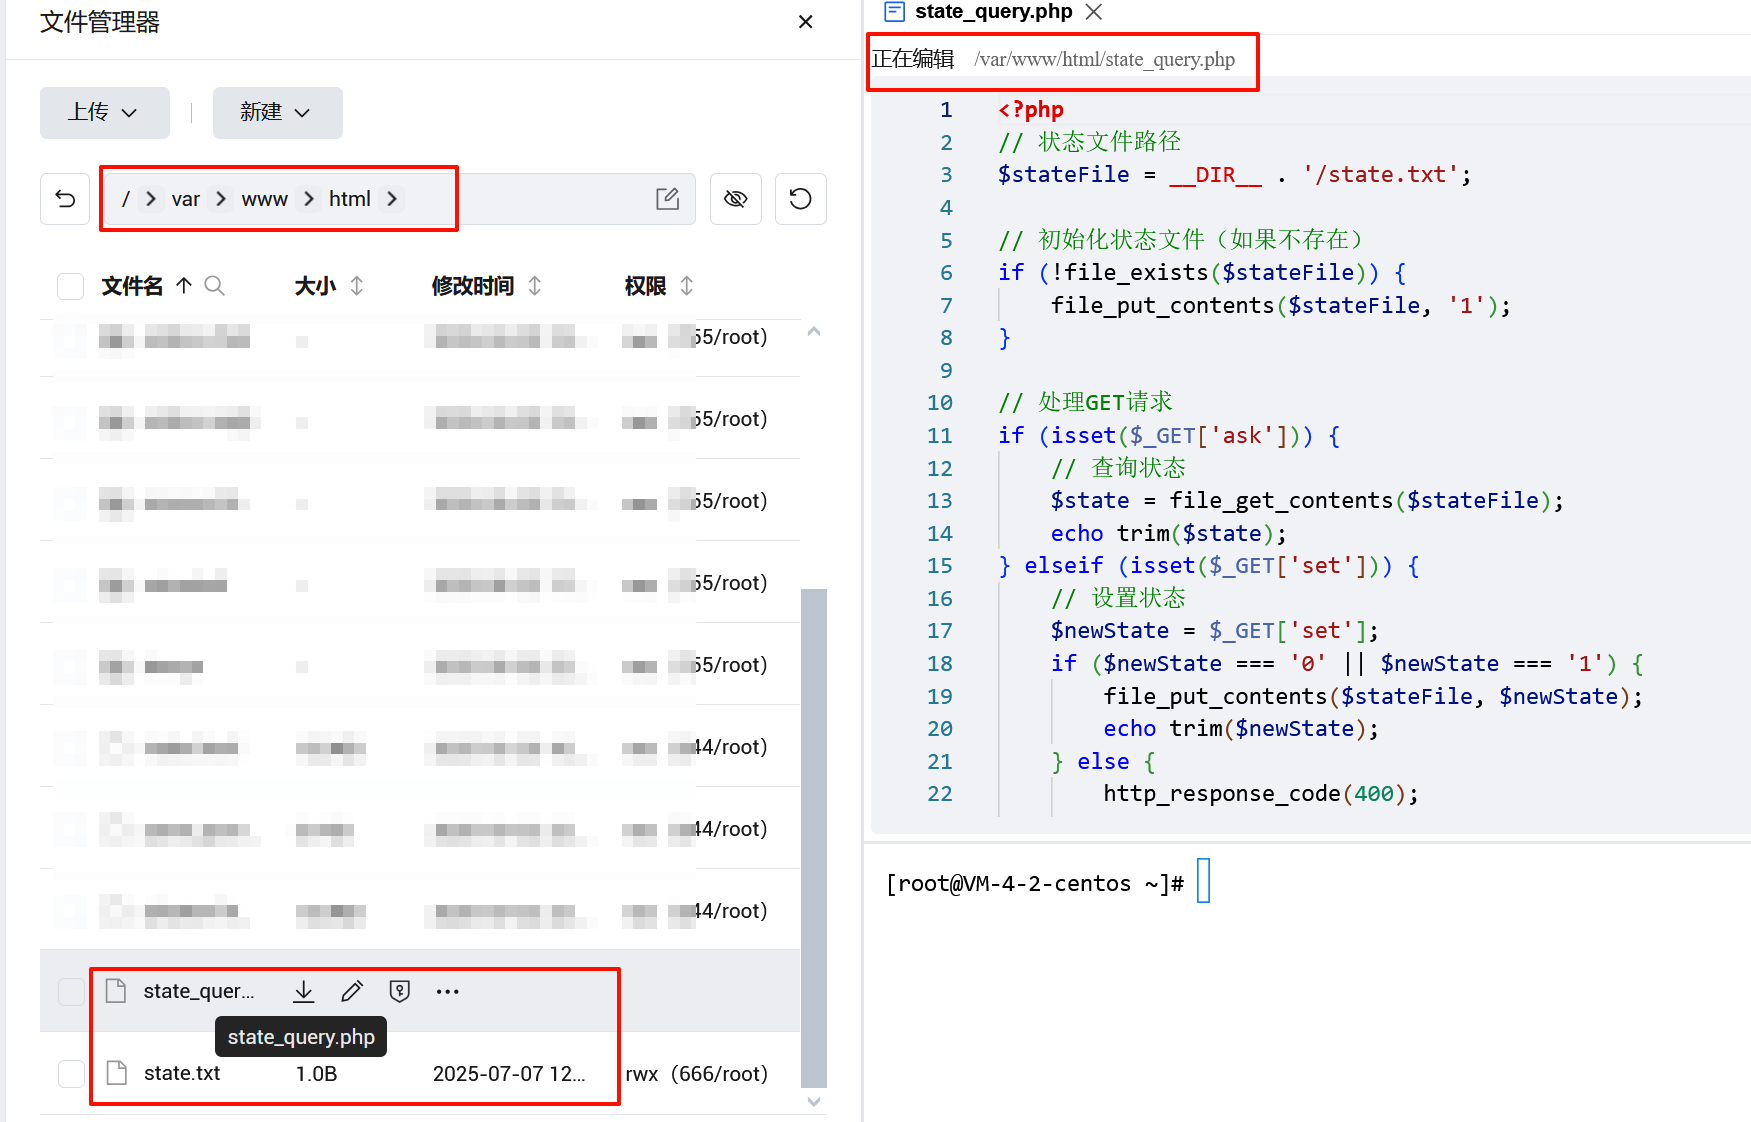
<?php // 状态文件路径 $stateFile = __DIR__ . '/state.txt'; // 初始化状态文件(如果不存在) if (!file_exists($stateFile)) { file_put_contents($stateFile, '1'); } // 处理GET请求 if (isset($_GET['ask'])) { // 查询状态 $state = file_get_contents($stateFile); echo trim($state); } elseif (isset($_GET['set'])) { // 设置状态 $newState = $_GET['set']; if ($newState === '0' || $newState === '1') { file_put_contents($stateFile, $newState); echo trim($newState); } else { http_response_code(400); echo "error1"; } } else { // 无效请求 http_response_code(400); echo "error2"; } ?> 只是为了向同目录下的 state.txt 里写入或读取当前状态,0 或 1
golang 锁屏器
package main import ( "fmt" "github.com/getlantern/systray" "github.com/lxn/win" "io/ioutil" "log" "net/http" "syscall" "time" ) const ( checkInterval = 5 // 检查间隔(秒) stateURL = "###目标服务器地址###/state_query.php" ) func main() { systray.Run(onReady, onExit) } func onReady() { systray.SetTitle("状态监控") systray.SetTooltip("系统状态监控程序") // 创建菜单项 mOpen := systray.AddMenuItem("打开", "打开主窗口") systray.AddSeparator() mQuit := systray.AddMenuItem("退出", "退出程序") // 初始隐藏控制台窗口 hideConsole() // 启动状态检查协程 go func() { log.Println("开始监控状态...") ticker := time.NewTicker(time.Second * checkInterval) defer ticker.Stop() for { select { case <-ticker.C: checkState() case <-mQuit.ClickedCh: systray.Quit() return case <-mOpen.ClickedCh: showConsole() } } }() } func onExit() { log.Println("程序已退出") } // 检查状态并根据结果锁屏 func checkState() { resp, err := http.Get(fmt.Sprintf("%s?ask=1", stateURL)) if err != nil { log.Printf("请求异常: %vn", err) return } defer resp.Body.Close() if resp.StatusCode != http.StatusOK { log.Printf("请求失败,状态码: %dn", resp.StatusCode) return } body, err := ioutil.ReadAll(resp.Body) if err != nil { log.Printf("读取响应失败: %vn", err) return } content := string(body) if len(content) == 0 { log.Println("收到空响应") setTrayIcon("unknown") return } firstChar := content[0] switch firstChar { case '0': log.Println("状态为0,执行锁屏") lockScreen() setTrayIcon("locked") case '1': log.Println("状态为1,不执行操作") setTrayIcon("unlocked") default: log.Printf("收到未知响应首字符: %c (完整响应: %s)n", firstChar, content) setTrayIcon("unknown") } } // 执行Windows锁屏操作 func lockScreen() { dll, err := syscall.LoadDLL("user32.dll") if err != nil { log.Printf("加载user32.dll失败: %vn", err) return } defer dll.Release() proc, err := dll.FindProc("LockWorkStation") if err != nil { log.Printf("查找LockWorkStation函数失败: %vn", err) return } r1, _, err := proc.Call() if r1 == 0 { log.Printf("锁屏失败: %vn", err) } else { log.Println("已锁屏") } } // 设置托盘图标状态 func setTrayIcon(status string) { // 这里简化处理,实际应用中可以使用不同的图标资源 switch status { case "locked": systray.SetTooltip("系统状态监控程序 - 已锁定") case "unlocked": systray.SetTooltip("系统状态监控程序 - 未锁定") case "unknown": systray.SetTooltip("系统状态监控程序 - 未知状态") } } // 隐藏控制台窗口 func hideConsole() { hwnd := win.GetConsoleWindow() if hwnd != 0 { var processID uint32 win.GetWindowThreadProcessId(hwnd, &processID) if GetCurrentProcessId() == processID { win.ShowWindow(hwnd, win.SW_HIDE) } } } // 获取当前进程ID func GetCurrentProcessId() uint32 { kernel32, err := syscall.LoadDLL("kernel32.dll") if err != nil { return 0 } proc, err := kernel32.FindProc("GetCurrentProcessId") if err != nil { return 0 } r1, _, _ := proc.Call() return uint32(r1) } // 显示控制台窗口 func showConsole() { hwnd := win.GetConsoleWindow() if hwnd != 0 { win.ShowWindow(hwnd, win.SW_SHOW) } } cmd 将可执行程序添加到自启动
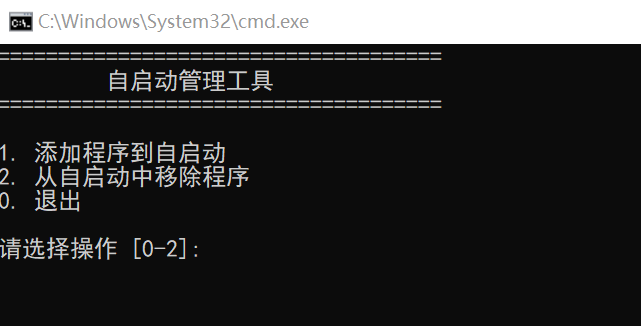
@echo off setlocal :: 设置应用程序名称和路径(可修改为实际程序路径) set "APP_NAME=状态监控程序" set "APP_PATH=%~dp0monitor.exe" :: 当前目录下的monitor.exe,可修改名称,可替换为完整路径 :: 注册表路径 set "REG_PATH=HKCUSoftwareMicrosoftWindowsCurrentVersionRun" :menu cls echo ===================================== echo 怜渠客云控自启动管理工具 echo ===================================== echo. echo 1. 添加程序到自启动 echo 2. 从自启动中移除程序 echo 0. 退出 echo. set /p choice=请选择操作 [0-2]: if "%choice%"=="1" goto add if "%choice%"=="2" goto remove if "%choice%"=="0" goto end goto menu :add :: 检查路径是否存在 if not exist "%APP_PATH%" ( echo 错误:程序路径不存在 - %APP_PATH% echo 请修改脚本中的APP_PATH变量为正确路径 goto :pause ) :: 尝试添加注册表自启动项 echo 正在添加自启动项... reg add "%REG_PATH%" /v "%APP_NAME%" /t REG_SZ /d "%APP_PATH%" /f :: 检查操作结果 if %errorLevel% equ 0 ( echo 自启动项添加成功! echo 程序将在下次启动时自动运行 ) else ( echo 自启动项添加失败! echo 请尝试以管理员身份运行此脚本 ) goto :pause :remove :: 尝试删除注册表自启动项 echo 正在移除自启动项... reg delete "%REG_PATH%" /v "%APP_NAME%" /f :: 检查操作结果 if %errorLevel% equ 0 ( echo 自启动项已成功移除! ) else ( echo 自启动项移除失败! echo 可能该自启动项不存在,或需要管理员权限 ) goto :pause :pause echo. pause goto menu :end echo 程序已退出。 endlocal 另存为.bat 文件后,以管理员权限运行,这个是为了添加编译好的 golang 程序添加到开机自启动,就能自动后台运行了。
额外补充(可以不用)
同时也用 Python 实现了一个锁屏器,虽然最后没有采用。
import requests import time import subprocess import os CHECK_INTERVAL = 5 # 检查间隔(秒) STATE_URL = "###目标服务器地址###/state_query.php" def lock_screen(): """执行Windows锁屏操作""" try: subprocess.run("rundll32.exe user32.dll,LockWorkStation", check=True) print("已锁屏") except subprocess.CalledProcessError as e: print(f"锁屏失败: {e}") except Exception as e: print(f"发生未知错误: {e}") def main(): """主程序:循环检查状态并根据结果锁屏""" print(f"开始监控状态,每{CHECK_INTERVAL}秒检查一次...") while True: try: response = requests.get(f"{STATE_URL}?ask=1", timeout=10) if response.status_code == 200: content = response.text.strip() if content == "0": print("状态为0,执行锁屏") lock_screen() elif content == "1": print("状态为1,不执行操作") else: print(f"收到未知响应: {content}") else: print(f"请求失败,状态码: {response.status_code}") except requests.exceptions.RequestException as e: print(f"请求异常: {e}") except Exception as e: print(f"发生未知错误: {e}") time.sleep(CHECK_INTERVAL) if __name__ == "__main__": main() 部署
代码是如何实现的,无关紧要,只要能实现功能即可。那如何部署使用呢?
首先,控制台网页要部署到服务器(所以需要一台服务器,唯一的额外成本,小型轻量云即可,大约 50 元/年)
注意:html 里的服务器地址要改成自己的
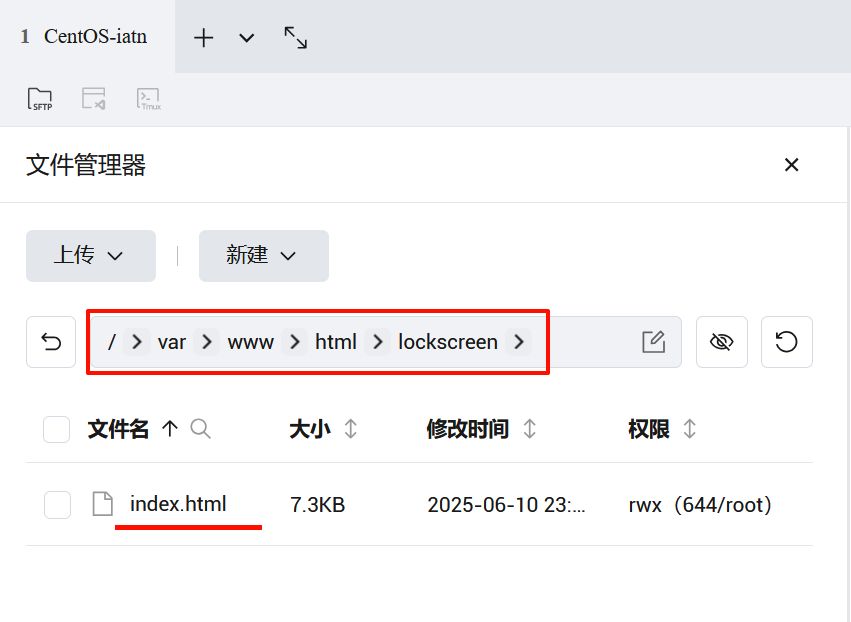
然后,php 代码要传到服务器,才能在控制台和锁屏器里访问。
第三,将前面 go 代码里的服务器地址改成自己的,编译成 exe,并使用.bat添加到开机自启动
这里需要一些 golang 开发经验,至少知道怎么打包。
以上,即可实现手机云控电脑锁屏。
手机端效果图
PC 端效果图


![洛谷 P11345 [KTSC 2023 R2] 基地简化 题解](http://www.itfaba.com/wp-content/themes/kemi/timthumb.php?src=http://www.itfaba.com/wp-content/themes/kemi/img/random/3.jpg&w=218&h=124&zc=1)
