
通常在 Web 开发中,会涉及静态资源的访问支持、视图解析器的配置、转换器和格式化器的定制、文件上传下载等功能,甚至还需要考虑到与Web服务器关联的 Servlet相关组件的定制。Spring Boot框架支持整合一些常用Web框架,从而实现Web开发,并默认支持Web开发中的一些通用功能。本文将对Spring Boot实现Web开发中涉及的三大组件Servlet、Filter、Listener以及文件上传下载功能以及打包部署进行实现。
为了实现并简化Web开发,Spring Boot为一些常用的Web开发框架提供了整合支持,例如 Spring MVC、Spring WebFlux等框架。使用Spring Boot进行Web开发时,只需要在项目中引入对应Web开发框架的依赖启动器即可。
在Spring Boot项目中,一旦引入了Web依赖启动器spring-boot-starter-web,那么SpringBoot整合 Spring MVC 框架默认实现的一些xxxAutoConfiguration自动配置类就会自动生效,几乎可以在无任何额外配置的情况下进行Web开发。Spring Boot为整合Spring MVC 框架实现Web开发,主要提供了以下自动化配置的功能特性。
(1)内置了两个视图解析器:ContentNegotatingViewResolver和BeanNameViewReso
(2)支持静态资源以及WebJars。
(3)自动注册了转换器和格式化器。
(4)支持Http消息转换器。
(5)自动注册了消息代码解析器。
(6)支持静态项目首页index.html。
(7)支持定制应用图标favicon.ico。
(8)自动初始化Web数据绑定器ConfigurableWebBindinglnitializer。
Spring Boot 整合 Spring MVC进行Web开发时提供了很多默认配置,而且大多数时候使用默认配置即可满足开发需求。例如,Spring Boot整合Spring MVC进行Web开发时,不需要外配置视图解析器。
Spring Boot 整合 Spring MVC进行Web开发时提供了很多的自动化配置,但在实际开发中还需要开发者对一些功能进行扩展实现。下面我们通过一个具体的案例讲解 Spring Boot整合Spring MVC框架实现Web开发的扩展功能。
使用Spring Inifializr方式创建名称为springboot02的Spring Boot项目,并导入Web依赖和Thymeleaf依赖。
让后我们启动该项目访问http://localhost:8080/ 可以看到下面的界面就表示访问成功,也代表我们项目创建成功。


我们在resources下的templates包里创建一个登录界面login.html
<!DOCTYPE html> <html> <head> <title>login</title> </head> <body> <form> <input type="text" name="username"> <input type="password" name="password"> <input type="submit" value="submit"> </form> </body> </html> 最后在com.hjk包下创建controller包并创建LoginController类
package com.hjk.controller; import org.springframework.stereotype.Controller; import org.springframework.ui.Model; import org.springframework.web.bind.annotation.GetMapping; import java.util.Calendar; @Controller public class LoginController { /** * 获取并封装当前年份跳转到登录页login.html */ @GetMapping("/toLoginPage") public String toLoginPage(Model model){ model.addAttribute("currentYear", Calendar.getInstance().get(Calendar.YEAR)); return "login"; } } 接下来使用Spring Boot 整合Spring MVC进行Web开发,实现简单的页面跳转功能,这里我们将使用Spring Boot提供的WebMvcConfigurer接口编写自定义配置,并对Web功能进行适当扩展。我们在这里分别演示视图管理器和拦截器的实现。
在springboot项目的 com.hjk下创建config包并创建一个实现WebMvcConfigurer 接口的配置类 MyMVCconfig,用于对 MVC框架功能进行扩展
package com.hjk.config; import org.springframework.context.annotation.Configuration; import org.springframework.web.servlet.config.annotation.InterceptorRegistry; import org.springframework.web.servlet.config.annotation.ViewControllerRegistry; import org.springframework.web.servlet.config.annotation.WebMvcConfigurer; import javax.annotation.Resource; @Configuration public class MyMVCconfig implements WebMvcConfigurer { @Override public void addViewControllers(ViewControllerRegistry registry){ registry.addViewController("/toLoginPage").setViewName("login"); registry.addViewController("/login.html").setViewName("login"); } } WebMvcConfigurer接口提供了许多MVC开发相关方法,添加拦截器方法addInterceptors(),添加格式化的器的方法addFormatters()我们这里实现拦截器的方法。
我们在config包下创建一个自定义拦截器类MyInterceptor,代码如下。
package com.hjk.config; import org.springframework.stereotype.Component; import org.springframework.web.servlet.HandlerInterceptor; import org.springframework.web.servlet.ModelAndView; import javax.servlet.http.HttpServletRequest; import javax.servlet.http.HttpServletResponse; import java.io.IOException; import java.util.Calendar; @Component public class MyInterceptor implements HandlerInterceptor { @Override public boolean preHandle(HttpServletRequest request, HttpServletResponse response, Object handler) throws Exception { String uri = request.getRequestURI(); Object loginUser = request.getSession().getAttribute("loginUser"); if (uri.startsWith("/admin")&& null==loginUser){ try { response.sendRedirect("/toLoginPage"); } catch (IOException e) { e.printStackTrace(); } return false; } return true; } @Override public void postHandle(HttpServletRequest request, HttpServletResponse response, Object handler, ModelAndView modelAndView) throws Exception { System.out.println("拦截器拦截"); } @Override public void afterCompletion(HttpServletRequest request, HttpServletResponse response, Object handler, Exception ex) throws Exception { } } 然后在config包下自定义配置类MyMVCconfig中,重写addlnterceptors()方法注册自定义的拦截器。添加以下代码。
@Autowired private MyInterceptor myInterceptor; @Override public void addInterceptors(InterceptorRegistry registry) { registry.addInterceptor(myInterceptor).addPathPatterns("/**").excludePathPatterns("/login.html"); } 测试:我们可以访问http://localhost:8080/admin 可以发现它重定向大toLoginPage界面了。
在这里我们使用组件注册方式对Servlet、Filter、Listener三大组件进行整合,我们只需要将自定义的组件通过ServletRegistrationBean、FilterRegistrationBean、ServletListenerRegistrationBean类注册到容器中即可。
我们在com.hjk包下创建servletComponent的包,在该包下创建MyServlet类并继承HttpServlet类。
package com.hjk.servletCompont; import org.springframework.stereotype.Component; import javax.servlet.ServletException; import javax.servlet.http.HttpServlet; import javax.servlet.http.HttpServletRequest; import javax.servlet.http.HttpServletResponse; import java.io.IOException; @Component public class MyServlet extends HttpServlet { @Override protected void doGet(HttpServletRequest req, HttpServletResponse resp) throws ServletException, IOException { super.doGet(req, resp); } @Override protected void doPost(HttpServletRequest req, HttpServletResponse resp) throws ServletException, IOException { resp.getWriter().write("hello MyServlet"); } } 创建 Servlet组件配置类。在项目com.hjk.confg包下创建一个Servlet组件配置类servietConfig,用来对 Servlet相关组件进行注册,
package com.hjk.config; import com.hjk.servletCompont.MyServlet; import org.springframework.boot.web.servlet.ServletRegistrationBean; import org.springframework.context.annotation.Bean; import org.springframework.context.annotation.Configuration; @Configuration public class ServletConfig { @Bean public ServletRegistrationBean getServlet(MyServlet myServlet){ ServletRegistrationBean registrationBean = new ServletRegistrationBean(myServlet, "/myServlet"); return registrationBean; } } 测试:项目启动成功后,在浏览器上访问“http://localhost:8080/myServlet"myServlet并正常显示数据,说明 Spring Boot成功整合Servlet组件。
在servletCompont包下创建一个MyFilter类并实现Filter接口,这个Filter的包别导错了
package com.hjk.servletCompont; import org.springframework.stereotype.Component; import javax.servlet.*; import java.io.IOException; @Component public class MyFilter implements Filter { @Override public void init(FilterConfig filterConfig) throws ServletException { } @Override public void doFilter(ServletRequest servletRequest, ServletResponse servletResponse, FilterChain filterChain) throws IOException, ServletException { System.out.println("hello MyFilter"); } @Override public void destroy() { } } 在config包下的ServletConfig类中进行注册,即在该类中添加方法。
@Bean public FilterRegistrationBean getFilter(MyFilter myFilter){ FilterRegistrationBean filterRegistrationBean = new FilterRegistrationBean(myFilter); filterRegistrationBean.setUrlPatterns(Arrays.asList("/toLogin","/myFilter")); return filterRegistrationBean; } 测试:在浏览器上访问“http://localhost:8080/myFilter”查看控制台打印效果(由于没有编写对应路径的请求处理方法,所以浏览器会出现404 错误页面,这里重点关注控制台即可),浏览器访问“http://localhost:8080/
myFilter”时,控制台打印出了自定义 Filter中定义 图5-6 使用组件注册方式整合Filter的运行结果的输出语句“hello MyFilter”,这也就说明Spring Boot 整合自定义Filter 组件成功。
(1)创建自定义Listener类。在com.itheima.senleiComponent包下创建一个类MyListener实现ServletContextListener接口
package com.hjk.servletCompont; import org.springframework.stereotype.Component; import javax.servlet.ServletContextEvent; import javax.servlet.ServletContextListener; @Component public class MyListener implements ServletContextListener { @Override public void contextInitialized(ServletContextEvent sce) { System.out.println("contextnitialized..."); } @Override public void contextDestroyed(ServletContextEvent sce) { System.out.println("contextDestroyed..."); } } 在servletConfig添加注册
@Bean public ServletListenerRegistrationBean getServletListener(MyListener myListener){ ServletListenerRegistrationBean servletListenerRegistrationBean = new ServletListenerRegistrationBean(myListener); return servletListenerRegistrationBean; } 需要说明的是,Servlet 容器提供了很多 Listener 接口,例如 ServletRequestListener、ritpSessionListener、ServletContextListener等,我们在自定义Listener类时要根据自身需求选择实现对应接口即可。
测试:程序启动成功后,控制台会打印出自定义Listener组件中定义的输出语句“contextlnitialized..”。单击图中的【Exit】按钮关闭当前项目(注意,如果直接单击红色按钮会强制关闭程序,浏览器就无法打印关闭监听信息),再次查看控制台打印效果。
程序成功关闭后,控制台打印出了自定义Listener组件中定义的输出语句“contextDestroyed..”。通过效果演示,说明了Spring Boot整合自定义Listener组件成功。
开发web应用时,文件上传是很常见的一个需求,浏览器通过表单形式将文件以流的形式传递给服务器,服务器在对上传的数据解析处理。
这个表单界面名为upload.html,在templates文件夹下
<!DOCTYPE html> <html lang="en"> <head> <meta charset="UTF-8"> <title>文件上传</title> </head> <body> <div style="text-align: center"> <form action="/uploadFile" method="post" enctype="multipart/form-data"> 上传:<input type="file" name="filename"/> <input type="submit" value="submit"/> </form> </div> </body> </html> 我们通过表单
我们通过提交的地址也应该清楚,我们肯定会写一个uploadFile的控制器。
我们在application.properties文件中添加配置,上传文件的大小限制。
## 文件最大限制为10mb,默认为1mb spring.servlet.multipart.max-file-size=1MB 我们在com.hjk.controller包下船舰一个名为FileController的类,用于实现文件上传的控制器。
我们这个文件上传只是实现一个简单的文件上传,并没有考虑上传文件重名的情况,实际上重名的话会覆盖之前的文件。要实现文件上传,我们肯定要给它一个唯一名称这个可以使用uuid实现,这里也没考虑文件存放位置问题,都是我自己把地址写死了,这里我们就不实现了。
实现历程:写这个控制器的时候,我的代码是正确的,前端文件也能提交,但是后端获取的文件就是null,我也看了很多博客,有的说是没有注册multipartResolver这个Bean,有的说是版本问题等等,但是都没有解决。最后一个不经意的小细节导致了我这次的代码不能获取到文件。那就是我们有在(@RequestParam("filename") MultipartFile file)前面加@RequestParam这个注解。反正我的这个是加上之后就能用了,我的这个springboot版本是2.6.6.至于真正原因现在不想思考了,等以后遇到再改吧。
@RequestPara("filename")必须获取参数名为filename的file参数
@RequestParam()默认为必传属性,可以通过@RequestParam(required = false)设置为非必传。因为required值默认是true,所以默认必传
@RequestParam("filename")或者@RequestParam(value = "filename")指定参数名
@RequestParam(defaultValue = "0")指定参数默认值
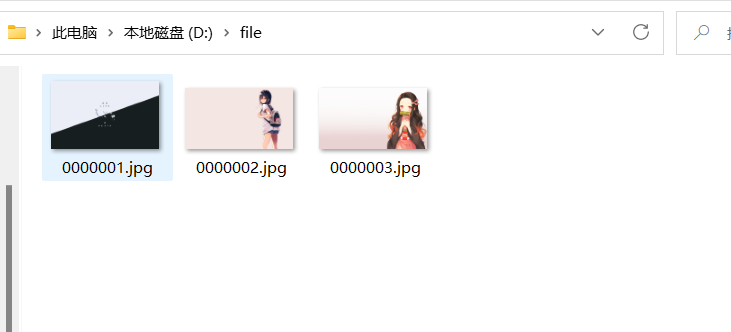
package com.hjk.controller; import org.springframework.stereotype.Controller; import org.springframework.web.bind.annotation.*; import org.springframework.web.multipart.MultipartFile; import java.io.File; import java.io.IOException; @Controller public class FileController { @GetMapping("/toUpload") public String toUpload(){ return "upload"; } @RequestMapping(value = "/uploadFile",method = RequestMethod.POST) public String uploadFile(@RequestParam("filename") MultipartFile file){ String filename = file.getOriginalFilename(); String dirPath = "D:/file/"; File filePath = new File(dirPath); if (!filePath.exists()){ filePath.mkdir(); } try { file.transferTo(new File(dirPath+filename)); } catch (IOException e) { e.printStackTrace(); } return "upload"; } } 在这里我们提交三张图片用于下面的文件下载
文件下载很多框架都没有进行封装处理,不同的浏览器解析处理不同,有可能出现乱码情况。
在添加完依赖之后我们创建一个名为filedownload.html的html,一会用于编写下载界面。
<dependency> <groupId>commons-io</groupId> <artifactId>commons-io</artifactId> <version>2.6</version> </dependency> 我们还是再FileController类里添加下载处理方法。直接在里面添加就行。
@GetMapping("/toDownload") public String toDownload(){ return "filedownload"; } @GetMapping("/download") public ResponseEntity<byte[]> fileDownload(String filename){ //指定下载地址文件路径 String dirPath = "D:/file/"; //创建文件下载对象 File file = new File(dirPath + File.separator + filename); //设置响应头 HttpHeaders httpHeaders = new HttpHeaders(); //通知浏览器以下载方式打开 httpHeaders.setContentDispositionFormData("attachment",filename); //定义以流的形式下载返回文件 httpHeaders.setContentType(MediaType.APPLICATION_OCTET_STREAM); try { return new ResponseEntity<>(FileUtils.readFileToByteArray(file),httpHeaders, HttpStatus.OK); } catch (IOException e) { e.printStackTrace(); return new ResponseEntity<byte[]>(e.getMessage().getBytes(), HttpStatus.EXPECTATION_FAILED); } } <!DOCTYPE html> <html lang="en" xmlns:th="http://www.thymeleaf.org"> <head> <meta charset="UTF-8"> <title>文件下载</title> </head> <body> <div style="margin-bottom: 10px">文件下载列表</div> <table> <tr> <td>0000001.jpg</td> <td><a th:href="@{/download(filename='0000001.jpg')}">下载文件</a> </td> </tr> <tr> <td>0000002.jpg</td> <td><a th:href="@{/download(filename='0000002.jpg')}">下载文件</a> </td> </tr> <tr> <td>0000003.jpg</td> <td><a th:href="@{/download(filename='0000003.jpg')}">下载文件</a> </td> </tr> </table> </body> </html> 我们这次使用了thymeleaf写前端代码。
实际上我们可能会遇到下载中文文件的问题,那样可能会乱码。
我么在这里写一个解决中文乱码的例子。例如:我把0000001.jpg改为"你好jpg"再重新部署下载,会发现名字为_.jpg
下面我们直接在我们在fileController类的里面加一个getFileName方法,并修改fileDownload方法上做修改。
public String getFileName(HttpServletRequest request,String filename) throws Exception { String[] IEBrowserKeyWords = {"MSIE","Trident","Edge"}; String userAgent = request.getHeader("User-Agent"); for (String ieBrowserKeyWord : IEBrowserKeyWords) { if (userAgent.contains(ieBrowserKeyWord)){ return URLEncoder.encode(filename,"UTF-8").replace("+"," "); } } return new String(filename.getBytes(StandardCharsets.UTF_8),"ISO-8859-1"); } @GetMapping("/download") public ResponseEntity<byte[]> fileDownload(HttpServletRequest request,String filename) throws Exception { //指定下载地址文件路径 String dirPath = "D:/file/"; //创建文件下载对象 File file = new File(dirPath + File.separator + filename); //设置响应头 HttpHeaders httpHeaders = new HttpHeaders(); //通知浏览器下载七千及性能转码 filename = getFileName(request,filename); //通知浏览器以下载方式打开 httpHeaders.setContentDispositionFormData("attachment",filename); //定义以流的形式下载返回文件 httpHeaders.setContentType(MediaType.APPLICATION_OCTET_STREAM); try { return new ResponseEntity<>(FileUtils.readFileToByteArray(file),httpHeaders, HttpStatus.OK); } catch (IOException e) { e.printStackTrace(); return new ResponseEntity<byte[]>(e.getMessage().getBytes(), HttpStatus.EXPECTATION_FAILED); } } springboot使用的嵌入式Servlet容器,所以默认是以jar包打包的。也可以进行war包打包,但是需要进行一些配置。
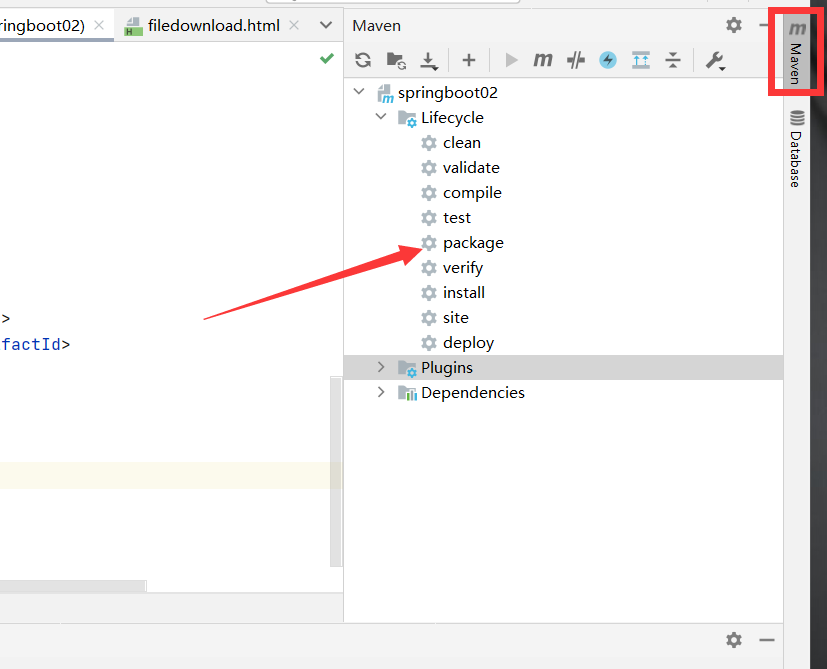
我们在创建springboot项目是默认会给我们导入maven的打包插件,如果没有我们手动加上即可。
<build> <plugins> <plugin> <groupId>org.springframework.boot</groupId> <artifactId>spring-boot-maven-plugin</artifactId> </plugin> </plugins> </build> 双击package等待即可
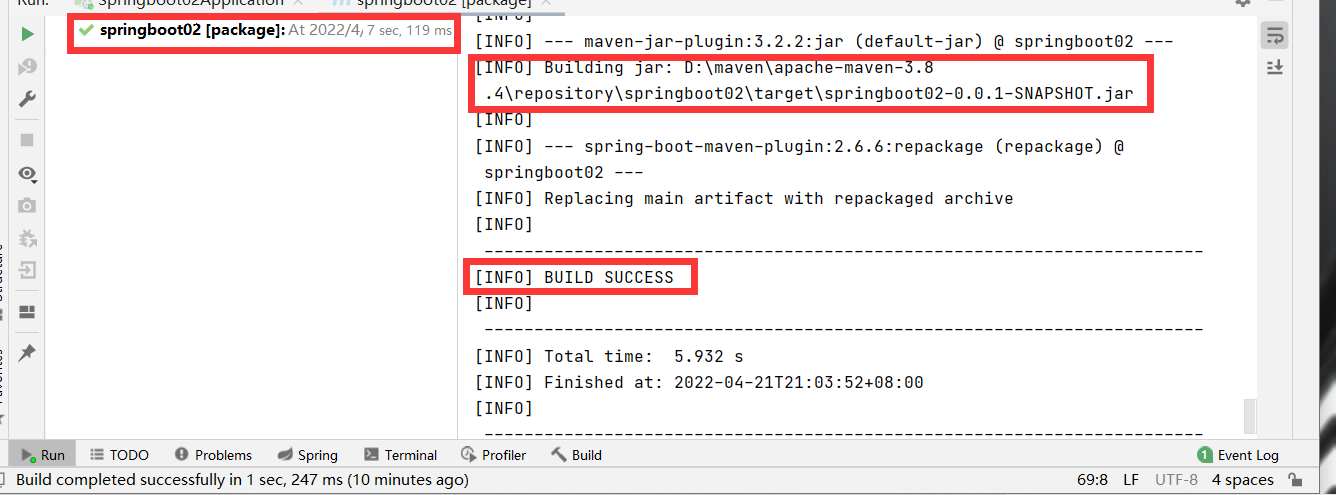
等待完成,可以看到打包时间,存放jar包位置等信息。我们也可以在target包下查看打成的jar包。
我们可以在关闭已启动的springboot项目后,在idea控制台输入命令启动。
java -jar targetspringboot02-0.0.1-SNAPSHOT.jar 我们也可以在系统自带的终端窗口启动
我们首先要把默认打包方式修改为war包
<name>springboot02</name> <description>Demo project for Spring Boot</description> <packaging>war</packaging> <properties> <java.version>1.8</java.version> </properties> 导入外部Tomcat服务器
<dependency> <groupId>org.springframework.boot</groupId> <artifactId>spring-boot-starter-tomcat</artifactId> <scope>provided</scope> </dependency> 打开启动类,继承springbootServletInitializer类
package com.hjk; import org.springframework.boot.SpringApplication; import org.springframework.boot.autoconfigure.SpringBootApplication; import org.springframework.boot.builder.SpringApplicationBuilder; import org.springframework.boot.web.servlet.ServletComponentScan; import org.springframework.boot.web.servlet.support.SpringBootServletInitializer; @ServletComponentScan @SpringBootApplication public class Springboot02Application extends SpringBootServletInitializer { public static void main(String[] args) { SpringApplication.run(Springboot02Application.class, args); } @Override protected SpringApplicationBuilder configure(SpringApplicationBuilder builder) { return builder.sources(Springboot02Application.class); } } 然后就和jar包方式一样了,双击package,等待打包完成。
war包的部署相比于jar包比较麻烦,我们需要外部的服务器,我们需要把war包复制到tomcat安装目录下的webapps目录中,执行目录里的startup.bat命令启动war包,这样我们就完成了。
我们对MVC进行了功能扩展和定制、servlet三大组件定制、文件上传和下载、以及两种方式打包部署。
评论已关闭。


![洛谷 P11345 [KTSC 2023 R2] 基地简化 题解](http://www.itfaba.com/wp-content/themes/kemi/timthumb.php?src=http://www.itfaba.com/wp-content/themes/kemi/img/random/3.jpg&w=218&h=124&zc=1)
